Salesforce Lightning 101 End-User Training Template
The Salesforce Lightning 101 End-User Training Manual. Customize and surface pre-built training content to drive Salesforce adoption.
Introduction
Transitioning from Salesforce Classic to Salesforce Lightning is a massive undertaking. The key to driving the adoption of appropriate processes and procedures in Salesforce Lightning is ensuring your team has access to the training, resources, and guidance they need without ever leaving Salesforce.
At Spekit, we wanted to make it as easy as possible for you to migrate to Salesforce Lighting, successfully. That’s why we’ve partnered with Salesforce admins and experts to create this Salesforce Lightning 101 Getting Started Guide.
Each of the below definitions, processes, and answers can be customized and automatically surfaced in your Salesforce Lightning instance with Spekit.
Watch the video below to learn more!
PRO TIP: Check out this case study to learn how Spekit helped Hobsons migrate to Lightning in lightning speed.
1. What is Activity Management in Salesforce Lightning
Activity Management refers to the Activity tab or Activity Center in your org. Here you’ll learn how to access the activity center in Salesforce Lightning.
Salesforce provides options to create an Event, a Task, an Email, or Log a Call in the Activity center. You can relate an activity to other records, such as an account, a lead, an opportunity, or a case. To access the Activity Center:
- Select a record, such as a particular Contact
- Scroll down to find the Activity tab
The Activity Center looks like this:

2. How to Add Columns & Groups to Reports in Salesforce Lightning
Learn how to choose which columns to include in your Report and how to group your Report based on the values in specified fields.
Open a Report
- Navigate to the Reports tab.
- Click “New Report” or choose an existing Report you want to edit.
- Choose a Report Type (Ex. Leads, Accounts, Opportunities etc.).
Adding/Removing Columns
Under the “Columns” section in the sidebar, you’ll see a list of all fields currently visible in your report:
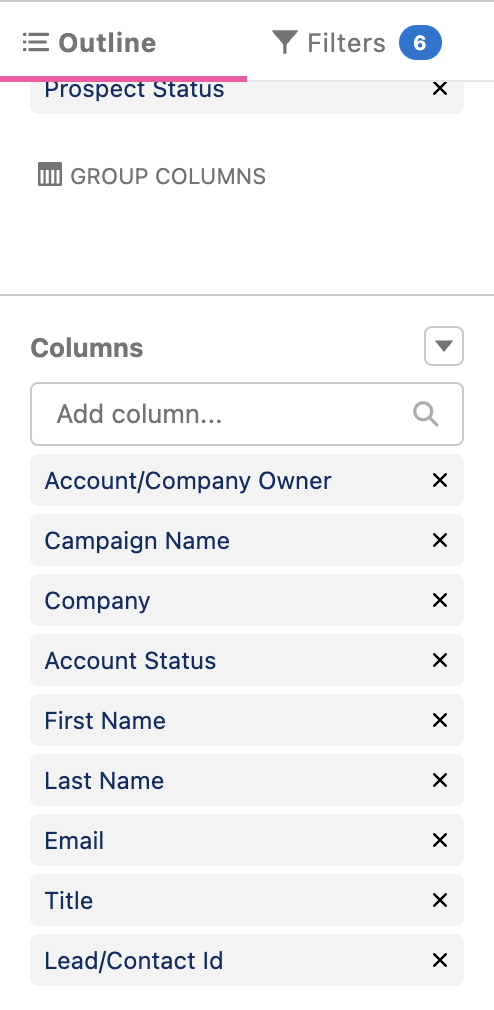
To add a new field, simply search for it within the search bar that reads “Add Column.”
Click on it, and the field will automatically be added to the report.
Grouping Reports
To group report results by values in a specific field, search the value in the “Group Columns” search bar as shown here:

3. How to filter a report in Salesforce Lightning
Learn the different types of Report Filters available in Salesforce Lightning and how to use them. Head to the Reports & Dashboards Trailhead Module for more hands-on practice.
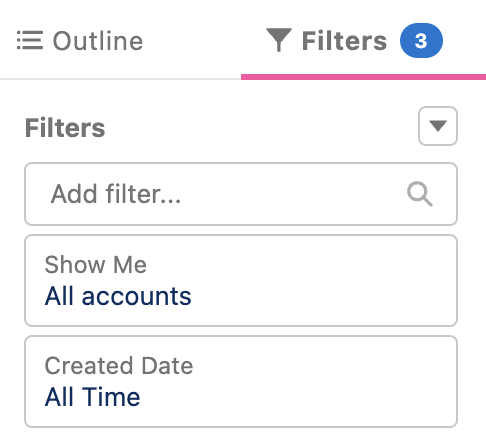
Filter Types
Standard Filters
The first type of report filters are Standard Filters. These filters are automatically applied to most objects and usually include the same two filters as shown below:
- Show Me filter: Allows you to filter by common groupings such as “All accounts” or “My
team’s accounts”. - Date filter: Allows you to specify records in different date ranges using date fields like “Created Date” or “Last Activity”.
Click on the filters as shown below and choose which fields you want to filter by.
Field Filters: These filter types are useful when you want to filter by a specific field value on that object.
Cross Filters: Using Cross Filters allows you to filter records in an object based on them having or not having a record in a specified related object. For example, in the image below you can see how to filter for Opportunities with Order:

Filter Logic: If you have more than one Field Filter applied to your report, there might be excluded records you actually want to see in your report. If this is the case, using Filter Logic can help get the desired result.
There are three main Logical Operators you can use:
- AND: Finds records that match both values.
- OR: Finds records that match either value.
- NOTE: Finds records that exclude values.
View the image below to see how you can filter by records with either Expected Revenue greater than $75,000 OR in the Value Proposition stage.
4. How to create a List View in Salesforce Lightning
Here’s how you can create a List View in Salesforce Lightning.
- This method can be used to create list views for Opportunities, Leads, Accounts and Contacts in Salesforce.
- When creating a new list view, it will automatically appear in the dropdown list so you can access it later.
- Users don’t need admin permissions to create list views, they can do it on their own and admins can control who can view the list.
- From the App Launcher, navigate to the Sales app and select the Opportunities tab.
- From the list view controls (the cog icon to the right of the page), select New.

- Name the list.
- Select who can view the list.
- Click Save.
The list view will show all the opportunities, regardless of type or location. You’ll notice that the Filters panel is also now available.
- Click Add Filter. From the Field dropdown menu, select a field. Select an operator and value.
- Click Done and then click Save.
- Follow the above method to add another filter.
Note: The new view will appear in the list view dropdown list so you can access it later.
5. How to customize a List View in Salesforce Lightning
After creating list views and applying filters, you can further select which fields you want to display and those you want to hide.
- Select the list view to customize.
- Click on list view controls (cog icon to the right), select “Select Fields” to display from the dropdown menu.
- Select the fields you want to display by moving them to the Available fields column. Move any fields you want to hide to the Visible fields column.

- Click Save.
6. How to delete a List View in Salesforce Lightning
After creating list views and applying filters, you can select which fields you want to display and those you want to hide.
- Select the list view to customize.
- Click on list view controls (cog icon to the right), select “Select Fields” to display from the dropdown menu.
- Select the fields you want to display by moving them to the Available fields column. Move any fields you want to hide to the Visible fields column.
- Click Save.
7. How to filter records in the List View in Salesforce Lightning
Learn more about editing list view filters in the Salesforce Lightning Experience here.
- In your personal developer instance, navigate to Incident > All
- Using the list header search, find all incidents containing the Short Description SAP:
A. Locate the list header search next to the New button in the list header
B. Change the dropdown selection to Short description
C. Type *SAP in the Search field
D. Press the enter key on the keyboard
E. Observe that the list has been filtered to show only items where the Short Description contains the text SAP - Use the context menu to show only the current items where the State field is In Progress.
A. Find a record where the State is In Progress
B. Right-click the In Progress text in the record’s State column
C. In the context menu that is displayed, click Show Matching
D. Observe that the list has been filtered to show items where the Short Description contains the text SAP and is also in the In Progress State - Use the Remove next condition icon (>) to remove the Short description contains SAP
condition in the filter breadcrumbs.
A. Locate the filter breadcrumbs next to the filter icon
B. Hover over the right angle bracket (>) before the Short description contains SAP
C. Observe the hover text says Remove next condition
D. Click the right angle bracket (>)
E. Observe the Short description contains SAP condition is removed from the
filter. - Use the filter condition builder to add a condition that shows only Critical Priority incidents.
A. Click the filter icon to open the condition builder
B. Observe that the State condition is still applied
C. Click the And button next to the State condition
D. Select Priority from the –choose field– dropdown
E. Select 1 – Critical from the third dropdown in the new condition
F. Click the Run button - Observe that the filter breadcrumb and list of incidents have been updated to reflect the changes to the filter conditions.
8. How to view more data about results in a report in Salesforce Lightning
Learn how to choose which columns to include in your report and how to group reports based on the values in specified fields.
Open a Report
- Navigate to the Reports tab
- Click “New Report” or choose an existing Report you would like to edit
- Choose a Report Type (Ex. Leads, Accounts, Opportunities etc.)
Adding/Removing Columns
Under the “Columns” section in the sidebar, view a list of all fields currently visible in your report.

To add a new field, simply search for it within the search bar that reads “Add Column.”
Once clicked, it will automatically be added to the Report.
9. How does Salesforce Lightning organize your data
Salesforce organizes data into Objects and Records. Think of an object as a tab on a spreadsheet and a record like a single row of data. But unlike a traditional spreadsheet, the data is stored in a trusted, secure cloud.

10. How to access all Tabs in Salesforce Lightning
Here’s how to access all the Tabs in your Salesforce organization in the Lightning edition.
- To access All Tabs on your Salesforce org in the Lightning edition, click on the App Launcher.
- View All Items by scrolling down.
11. How to access Chatter in Salesforce Lightning
- To access Chatter, click on the Chatter tab in your Salesforce.
- If you don’t see the Chatter tab, open the App Launcher and search for Chatter. Click it, and you’re good to go.
12. How to add a profile picture on Salesforce Lightning
Adding a profile picture is one of the first things you can do when setting up your Salesforce
account. Adding a profile picture allows others to identify you easily.
Here’s how to add a profile picture to your Salesforce account in the Lightning edition.
- Click on the image in the top right corner of Salesforce and click your name.
- Click on the camera icon in the blank image space to the left of the page and select Upload
Photo. - Click Upload Image and select the image you want to add. Optionally, you can choose to
show your photo on publicly accessible pages. Finally, click Save.
13. How to ask a Question in Chatter
Here’s how to ask a question in Chatter:
- Click on the Chatter tab in Salesforce.

- Click the Question tab. Enter the question you want to post in the Question box and any
description or details about your question in the Details box. - Click Ask.

14. How to change your Personal Information in Salesforce Lightning
Personal Settings include information such as Name, Password, Contact Information, Designation and more. Here’s how to change your personal settings:
- Access personal settings by clicking on your picture in the top right and select Settings.

- Now click My Personal Information and choose which field you would like to edit from the
drop-down menu such as “change my Password.”

15. How to convert a Lead in Salesforce Lightning
Here’s how to convert a Lead in Salesforce to an Account, Contact, or Opportunity in the Lightning edition.
Each lead conversion in Salesforce creates an Account, Contact, and Opportunity, as shown
below:

- Click on the Leads tab in Salesforce.

- Select the Lead you want to convert. Click on the arrow button to the right of the page and
from the drop-down menu select Convert.

- When you convert a lead, Salesforce creates a new Account, Contact, and Opportunity all at
once. Give them a name respectively. You can choose an existing Account, Contact or
Opportunity rather than creating a new one. Once you have filled in the information, click
Convert.

16. How to create a Campaign in Salesforce Lightning
A campaign is a marketing initiative, such as an advertisement, direct mail, conference or any
event that you conduct to generate prospects and build brand awareness.
Here’s how to create a new campaign in the Salesforce Lightning Experience.
- Click on the Campaigns tab in Salesforce.

2. Click New on the right side of the page.

- Fill in the required information such as the Campaign Name and any other information
available. Now click Save.

17. How to Create a Case in Salesforce Lightning
A Case is a detailed description of a customer’s feedback, problem, or question. Use Cases to track and solve customer issues and complaints.
Here’s how to create a case in Salesforce Lightning:
- Click on the Cases tab in Salesforce and click New.
- Fill in the required information and other details available and click Save.
OR, you can create a Case by using quick links or related lists.
Example: Click on the contacts tab and choose the contact you want to create a case for. On the Contact detail page, scroll down to Related Lists or quick links. The quick links will appear as shown below. Click on Case to create a new case.

18. How to Create a Contact in Salesforce Lightning
Here’s how to create a Contact in Salesforce Lightning:
Click on the Contacts tab in Salesforce

2. Click New
3. Fill in the required information and click Save

19. How to create a Dashboard in Salesforce Lightning
Dashboards are a graphical representation of data, such as pie charts and bar graphs. Here’s how to create a Dashboard in Salesforce Lightning:
- Click on the Dashboards tab in Salesforce.
- Click on New Dashboard. Optionally click on New Folder to create a new folder where the dashboard can later be accessed.
- Give a name to the new dashboard and add a description. Now select a folder to save the dashboard in and click Create.
- Click Save.
- Once you’ve saved the dashboard, you can add one or multiple components. Simply click on the component to edit.
20. How to create a Poll in Chatter
Here’s how to create and take a poll in Chatter.
- Click on the Chatter tab in Salesforce.
- Click on the Poll tab.
- In the question field, enter the text for your poll, followed by the selection options in the
choice field. - Click on add new choice to add more options.
- To publish your poll, click Ask.
21. How to create a report in Salesforce Lightning
A Report is a list of information or records organized for easy analysis or exporting. Here’s how to create a Report in Salesforce Lightning.
- Click on the Reports tab in Salesforce.
- Click on New Report.
- Choose a Report Type and click Continue.
- From the menu on the left choose which fields you would like to remove or add on the report,
for example, opportunity name, stage, etc. - Once done with step 4, click Save on the top right of the page.
- Give the report a name and choose a folder to save it in. Now click Save.
22. How to create an Account in Salesforce Lightning
Here’s how to create an Account in Salesforce Lightning.
- Click on the Accounts tab.
- Click on New.
- Fill in all the required information and click Save.
23. How to create an Account Contact Relationship in Salesforce Lightning
Here’s how to create an Account Contact Relationship in Salesforce Lightning.
- Click on the Accounts tab in Salesforce and select the Account you want to add a relationship
to. - Scroll down to the Related List Quick Links and hover Related Contact.
- On the pop-up window, click Add Relationship.
- Fill in the required information and any other details available. Click Save.
24. How to create a Task in Salesforce Lightning
Here’s how to create a Task, an activity typically associated with a contact or lead.
- Select New Task from the Activity center as shown below.
- To access the activity center, choose a record such as a lead, account, contact or
opportunity you want to add a task to. - On the records detail page scroll down to the activity center and select New Task.

2. Fill in the details and click save.

25. How to create an Event in Salesforce Lightning
Here’s how to create an event in Salesforce Lightning.
- Select New Event from the Activity center as shown below.
- To access the activity center, choose a record such as a lead, account, contact or
opportunity you want to add an event to. - On the records detail page scroll down to the activity center and select New Event.
Fill in the required details and click Save.
26. How to create an Opportunity in Salesforce Lightning
- Click on the Opportunities tab in Salesforce.

2. Click on New.
3. Fill in the required details and click Save.
27. How to Customize Pages in Salesforce Lightning
A page layout has many related lists. You can customize which ones you see and their order. Here’s how to customize pages in your Salesforce.
- Click on your image in the top right corner of your Salesforce page. Click on Settings.

- From the column to the far left, click on Display and Layout. Now select Customize My Pages from the drop-down menu.

- On the “Change My Display” page, click on the arrow button to choose a page to customize,
such as Accounts, and click Customize Page.

- Choose the related lists to display on the page by using the add and remove button. You can also reorder the list using the up and down buttons. Now click Save.
- Once saved, the main “Change My Display” page will reload. Be sure to click Save or your settings will not update in Salesforce.
28. How to Customize Tabs in Salesforce Lightning
One of the easiest and most effective customizations you can make in Salesforce is to change the tabs that appear when you log in. Here’s how to customize your Salesforce tabs.
- Click on the Pen Icon to the far right of all Tabs in Salesforce.
- Simply hold, drag and drop objects in the desired sequence. You can add more items not already on the existing list. Once done, click Save.

29. How to Edit and Delete a Contact in Salesforce Lightning
Here’s how to edit and delete a Contact from Salesforce.
- Click on the Contacts tab in Salesforce and select the contact you want to edit or delete.
- On the contacts detail page, click Delete to delete the account OR click on Edit to edit the account.
- The Edit and Delete tab will appear on the top right side of the contact detail page along with other options such as new case, etc.
- The Edit and Delete tab will appear on the top right side of the contact detail page along with other options such as new case, etc.
- If you don’t see it, click on the arrow button and select edit/ delete from the drop-down menu.
- When you click on delete, a pop-up will appear asking for confirmation. Click OK to permanently delete the contact or Cancel to go back to the main page.
30. How to edit and delete an Account in Salesforce Lightning
Here’s how to edit and delete an Account in Salesforce Lightning.
- Click on the Accounts tab in Salesforce and select the contact you want to edit or delete.
- On the accounts detail page, click Delete to delete the account OR click on Edit to edit the account.
- The edit and delete tab will appear on the top right side of the accounts detail page along with a few options such as new case, etc.
- If you don’t see it, click on the arrow button as shown above and select edit/ delete from the drop-down menu.
- When you click on delete, a pop up will appear asking for confirmation. Click OK to permanently delete the contact or Cancel to go back to the main page.
- To edit the account, click edit and update the existing information or fill in any fields that were previously blank. Click Save.
31. How to edit and delete an Opportunity in Salesforce Lightning
Here’s how to edit and delete an Opportunity in Salesforce Lightning.
- Click on the Opportunities tab in Salesforce and select the opportunity to edit or delete.
- On the opportunities detail page, click Delete to delete the opportunity OR Edit to edit the opportunity.
- The edit tab and delete tab will appear on the top right side of the accounts detail page along with options such as new case, etc.

4. If you don’t see it here, click on the arrow button as shown above and select edit/ delete from the drop-down menu.
5. When you click on delete, a pop up will appear asking for confirmation. Click OK to permanently delete the record or click Cancel to go back to the main page.
6. To edit the opportunity, click on Edit and update the existing information or fill in any fields that were previously blank. Click Save.

32. How to Log a Call in Salesforce Lightning
Here’s how to Log a Call in Salesforce Lightning.
- Select a specific Lead, Account, Contact or Opportunity for which you want to log a call. In the Activity center click on Log A Call. Click Add.
- OR – Select Log a Call from the Global Actions menu. You can access Global Actions by clicking on the + button at the top of your Salesforce page.
- Fill in the required information and click Save.

33. How to login to Salesforce Lightning
Here’s how to login to Salesforce Lightning from the website.
- Type www.salesforce.com in the address bar of the web browser you are using.
- Click on Login at the top right of the page.
- Enter your email/username and password and click on login.
34. How to post in Chatter in Salesforce Lightning
Here’s how to post in Chatter in Salesforce Lightning.
- Click on the Chatter tab in Salesforce.
- Click on the Post tab.
- Click into the Share an update text box to type your message.
- You have access to multiple options in the Chatter publisher.
- With the rich text editor, you can add style, lists, images, emojis, and mentions to your post.
- You can link to a record, like an account, opportunity, case, or even another user with the link-to-records feature.
- You can attach up to 10 files to a post or question using the paperclip.
- Type in your text and click Share to post.

35. How to switch between Salesforce Classic and Salesforce Lightning
Here’s how to switch from Salesforce Classic to Salesforce Lightning and vice versa.
- When in Salesforce Classic, click on the Switch to Lightning Experience option at the top of the page after logging into Salesforce.
- When in Salesforce Lightning, click on your image in the top right corner of the page and select Switch to Salesforce Classic

36. How to Navigate Chatter in Salesforce Lightning
Here is how to navigate the different features available to you in Chatter. Once you’ve opened Chatter, you can post to a person’s profile, ask questions or discuss a particular record.
- You have access to different views of your Chatter feeds to quickly access what you need.
- Streams are super feeds you can create by combining feeds from different objects.
- Recent Groups shows a list of the top five most recently visited groups.
37. How to navigate Salesforce Lightning
Here’s a quick overview of the different features available to you in the Salesforce Lightning Experience.
At the top of each Salesforce page, you’ll find tabs and links for navigating to major features.
- Use the tabs such as Home, Leads, Contacts to switch between objects and features.
- Search to find any type of record.
- Favorites are shortcuts to what you use frequently in Salesforce. When you’re on a record, dashboard, or something else you use often, click the Star to add it to your favorites.
- You’ll notice a “+” sign that opens the Global Actions menu. Use it to easily create an event, log a call and even create a new contact.

- You can easily access Help Resources and Training by hovering over the question mark
as shown below.

- Use the Setup menu to customize Salesforce for your org. (You must have administrative permissions).
- This is the Notifications icon. View all notifications by hovering over the bell as shown below.

- Access user-specific customizations by clicking on the image, such as Profile Settings to customize your display or personal information.
- Use the pen enclosed by a box (edit icon) for quick access to editing the tabs you see on the top of your Salesforce page such as Lead, Account and more.
38. Objects, Fields & Data Types in Salesforce Lightning
An Object is the categorization of the type of information you’re storing in Salesforce. For example, if you want to store information on all individuals you met at a business conference along with their details, you would do this in Contacts, which is an Object in Salesforce. Each individual contact name in your Salesforce contacts is a separate record.
A Field in Salesforce is a placeholder for storing information. Using the above example, each record in your Salesforce contacts will include details of the individual such as their name, phone number, address, etc.
All these details are separate fields in Salesforce. There are
several types of fields in Salesforce and admins can further create custom fields for their org.
Each field has a different Data Type. This is the format of the data that can be entered in the field. Some examples of data types include text, currency, date, time, checkbox, URL and more depending on the field involved.
Here’s a visual to sum up the above:

39. How to use Related Lists in Salesforce Lightning
Related Objects such as related accounts, related contacts, notes, etc., are chosen by the administrator to display in the mini-view when records of a particular type, for example, the
account ABC Corporation, are shown in the detail view.
For example, when a Case is in the detail view, an administrator can choose to display an associated account, contact, or asset in the mini view. These objects in the mini-view are hoverable links.
Salesforce provides its users with Related List Hover Links.
This is a type of link that allows you to quickly view the information by hovering your mouse over the link. Your administrator must enable the display of hover links. The displayed text contains the corresponding related list and number of records.
The Related List Hover Links usually contain some of the following:
- Related Accounts
- Related Contacts
- Notes
- Cases
- Account Team
- Opportunity team
- Contact Roles
The Related List needs to be enabled by the Admin in order to appear on the page layout.
These can be customized according to what suits your org.
There are plenty of items that can be added to the above list but the admin must choose which lists they want to be displayed in their org.
Where are the Related Lists Hover Links in Salesforce?
You can access these hoverable links in Salesforce by selecting a specific Lead, Account, Contact or Opportunity.
In Salesforce Lightning the related lists of quick links will appear as so:

