Chorus Getting Started Content Template
Help your reps get the most value possible out of Chorus by reinforcing crucial training and best practices right where they're working.
1. Getting Started with Chorus
Welcome to Chorus!
Chorus captures and analyzes all of your customer-facing calls, meetings, emails, and CRM data, so managers have a complete picture of what’s happening across the entire customer relationship.
When your job involves having customer conversations day-to-day, it can be incredibly challenging to keep track of what was said on calls, create great customer follow-up, and communicate customer feedback to your manager or stakeholders. Chorus becomes your virtual personal assistant & streamlines processes for:
● Follow up & next steps
● Sharing wins
● Getting feedback from managers
● Understanding how you compare to your peers
● Understanding where deals are in the sales/upsell/renewal pipeline
● Collaborating & sharing meeting takeaways cross-functionally
Use Spekit to customize this content template with your own coaching scripts, playbooks, objection handling docs and more and surface within Chorus to help reps close more revenue, faster.
2. Setting Up Your Voice Fingerprint in Chorus
A voice fingerprint is like facial recognition, but for your voice–it allows Chorus to better recognize your voice resulting in a more accurate transcription and speaker separation on your calls thanks to our best-in-class model being trained exclusively on Sales and CS conversations.
While Chorus is smart enough to do this over time, adding a voice fingerprint out of the gates will keep your calls polished from the get-go.
Set up your voice fingerprint using these steps:
- Log in to Chorus
- Click on your profile icon at the bottom left of the screen
- Select Settings
- Under Voice Fingerprint, click Create Voice Fingerprint
- Click Start Recording
- In the pop-up, click Allow to allow Chorus to use your microphone
- Record yourself reading the text provided with a natural tone and cadence as if you were in a live call
- When you’re done recording yourself, click Complete
- Click Finish and your voice fingerprint will process
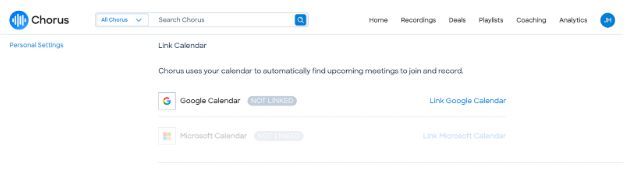
3. How to Connect Your Calendar to Chorus
Chorus uses your calendar to find upcoming sales meetings to join and record automatically. There are two ways you can sync your calendar if you have Google Calendar or Microsoft Calendar.
OPTION 1: Connect and sync your calendar via the Settings page.
- In Chorus, go to your Initials at the top right of the page > Settings > Personal Settings
- Under Link Calendar, click Link [Calendar Option] to sync your calendar
OPTION 2: Connect and sync your calendar via the Connect Calendar Button
On the Home page, you’ll see your scheduled meetings. If your calendar is not connected, you’ll see a “Connect Calendar” button. Click this button to be taken to your personal settings to link your calendar to Chorus. All set! Typically, your calendar is synced when you log in for the first time and authenticate with either Google or Microsoft.
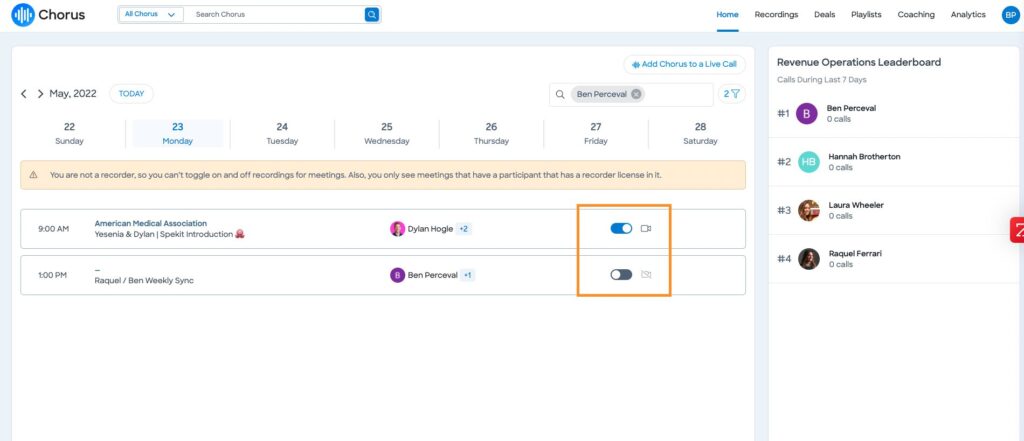
Once synced, you should see your upcoming meetings populate on the Home page in Chorus. You can proactively toggle recording on or off for one-off meetings as needed. For example, the weekly project sync call typically isn’t set to record by default, but this week we have special training that we do want recorded, so I’m going to toggle recording ON for that meeting.
After the Calendar Is Synced
Once synced, you should see your upcoming meetings populate on the Home page in Chorus. You can proactively toggle recording on or off for one-off meetings as needed. For example, the weekly project sync call typically isn’t set to record by default, but this week we have a special training that we do want recorded, so I’m going to toggle recording ON for that meeting.
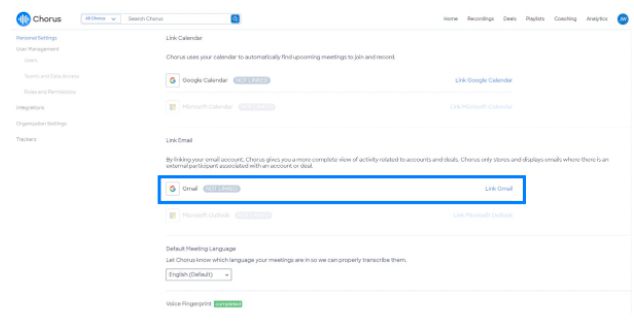
4. How to Connect Your Email to Chorus
Chorus will sync both inbound and outbound (received and sent) emails from email accounts connected to Chorus – excluding deleted and draft emails. Chorus only processes calls/emails related to customer or prospect correspondence to avoid displaying internal and/or private correspondence.
Integrate Your Email
Users can integrate their emails with Chorus by using the following steps:
- In Chorus, go to Settings
- In Settings, click on Personal Settings
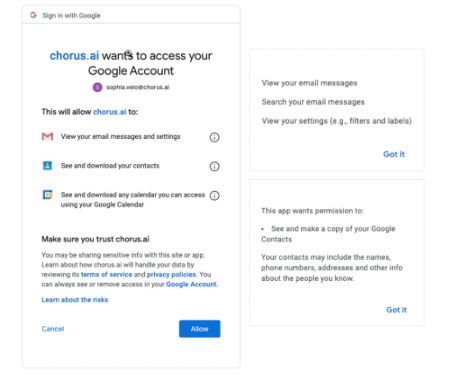
- Under Link Email, click Link Gmail
After selecting the option to link your email in Chorus, you’ll be redirected to the Google authorization page requesting you to log in and connect:
5. Stage 1 Weekly Call Review in Chorus
On the Friday of each week, AEs will review one call that took place during Stage 1.
- Go to the Stage 1 Call Review List view in Chorus
- Click on the call you want to review
- Leave Comments in on the Chorus call
- 3 things you did well and why
- 3 areas of opportunity
- 1 Moment you would take back/do differently
- Any asks of the business (resources, coaching, deal planning etc)
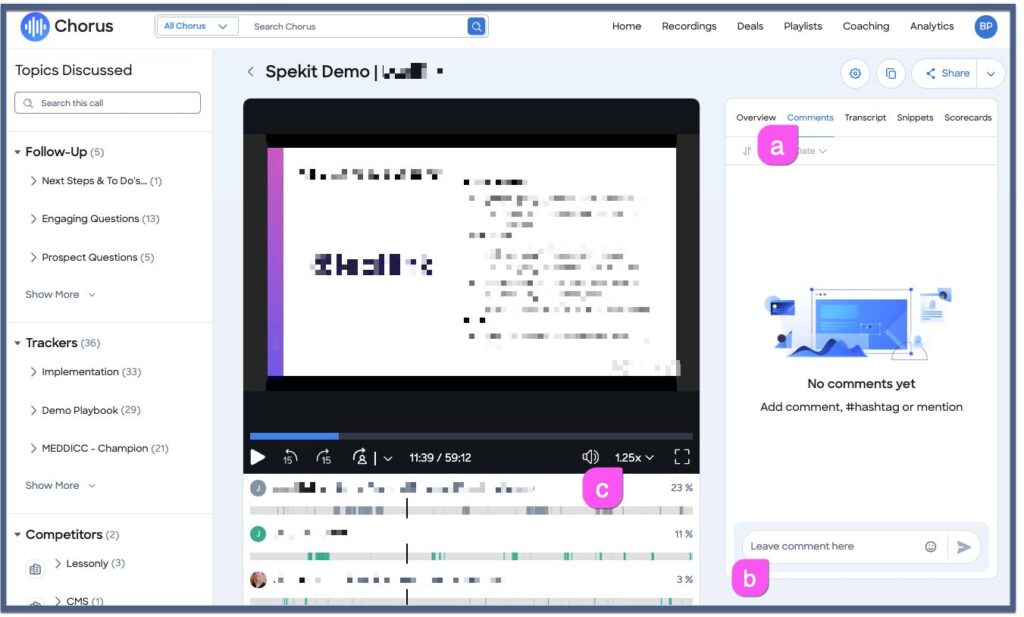
Leaving Comments in Chorus
a) Click on the comments section
b) Leave your comment here (you can also use #hashtags and @mentions)
c) To rewatch the call more more quickly you can increase the playback speed
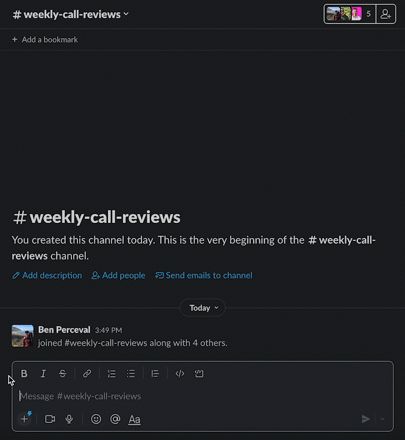
4. In the #weekly-call-reviews Slack channel:
- Use the plus button to access the Submit Call Review shortcut
- Alternatively, start typing ‘/submit call review’ to access the shortcut
- Fill out the form with a summary of your review and post to the channel
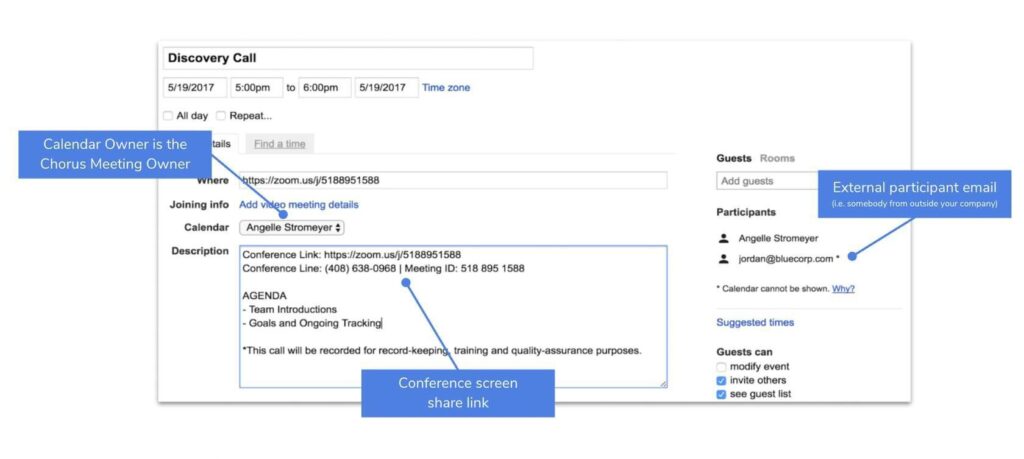
6. How Chorus Records Calls
Once you sync your calendar, Chorus will automatically join calls that:
- Includes a person outside of your organization on the invite list with a business email
- Includes a conference link (e.g. Zoom, GoToMeeting, etc.)
- Is scheduled at least 10 minutes before start time (but you can always add Chorus once you are in a new call)
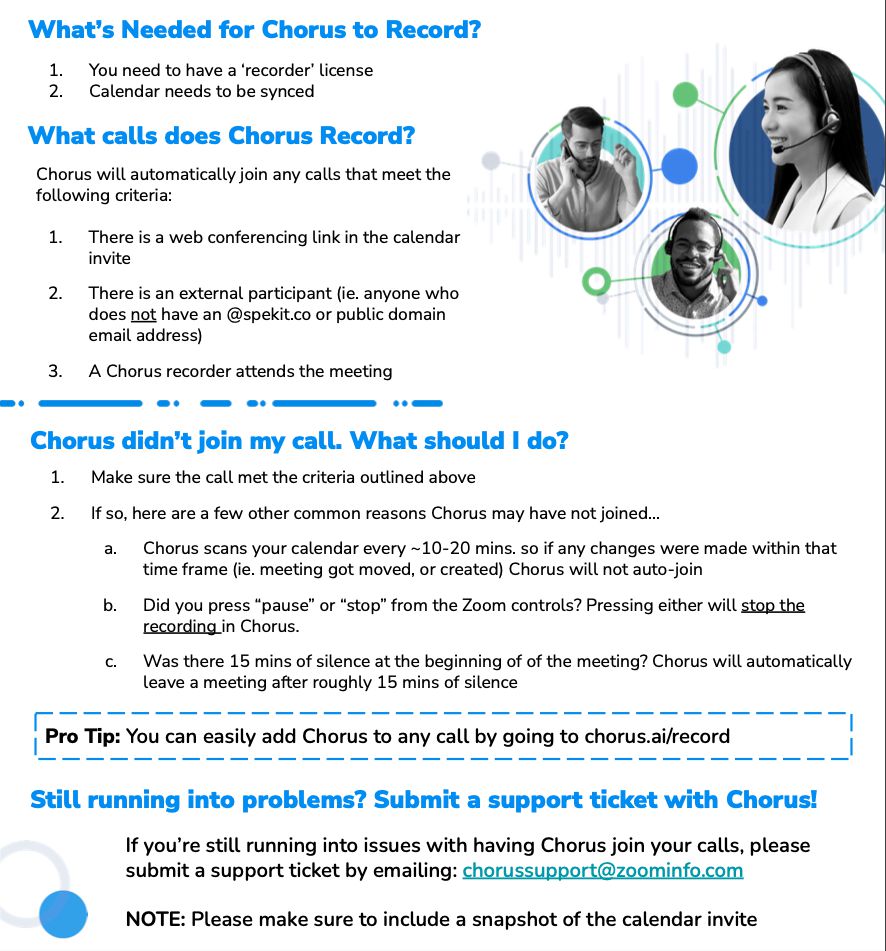
What’s needed for Chorus to Record?
7. How Chorus Looks On Calls
When Chorus joins your call, Chorus is transcribing the call in real-time, so you can immediately review it in Chorus after the call.
When the call has ended, the call is available in Chorus for review immediately and has a “processing” tag. Transcribing the call typically takes half the length of the call to fully process (i.e. if the call was 30 minutes, it should take 15 minutes to transcribe the call).
However, you can immediately listen to the audio and click on trackers while the transcription is processing.
Customers may ask what Chorus is and why it is showing on the call.
Use these sample phrases to explain Chorus to customers:
- Chorus helps me concentrate on our discussion instead of having to take notes while you’re speaking.
- I will review our call to make sure I follow through with any commitments I’ve made and nothing falls through the cracks and loop in any additional team members as needed.
- I’m happy to share the recording of this call with you so you can review it and share it internally as needed.
On a rare occasions (less than 2% of calls or people), a customer may ask not to be recorded due to compliance or personal reasons. Click here to learn how to Prevent a Meeting from Being Recorded.
Chorus may appear on the call as:
- Non-video participants in your meeting room
- Live on Zoom with Chorus.ai
- Microsoft Teams with Chorus.ai
8. How to Use the Chorus App for Zoom Meetings
The Chorus app for Zoom Meetings, available in the Zoom App Marketplace, enhances virtual collaboration by providing in-meeting applications for the tools you use everyday. Use the Chorus app for Zoom Meetings to seamlessly engage with your colleagues for team selling, and pre-designate each important moment — all while live on your call.
To enhance your in-meeting experience with the Chorus app for Zoom, you can use Chorus’ native recording app from the Zoom Marketplace in parallel. There’s a good chance this is already available to you: look for the Live on Chorus.ai with Zoom indicator in the top left of your calls. Reach out to your Chorus admin or support@chorus.ai if you have any questions regarding your access.
How to download and use the Chorus App for Zoom
- From your personal Chorus settings page, look for the Zoom App Integration section. If you see this section, it means that your admin has already set up the Chorus App for Zoom Meetings, and you can select Install Zoom App. If you do not see this option, go to the next step.
- Go to the Zoom Apps Marketplace and download the Chorus app for Zoom. Note: your Zoom Admin will need to enable the Zoom Apps feature in order for you to download the Chorus app from the Zoom Marketplace.
- Click Add to add the Chorus app.
- Now that the Chorus app is added, open up a Zoom meeting on your desktop, and click on the Apps button in the Zoom toolbar.
Within My Apps, find Chorus for Zoom Apps, and click Open to launch it and start reaping the benefits!
How to use the Chorus app for Zoom Meetings
- Once installed, the Chorus app for Zoom will be accessible on your customer-facing calls where you see the “Live on Chorus”. If Chorus isn’t recording the call, add Chorus to a live call by opening the Chorus app for Zoom.
- Open the Chorus app for Zoom by selecting it from your active Zoom Apps list in the dropdown.
- Take notes live in-app to craft better action plans and follow-ups, as your notes will be attached to the actual conversation context.Start typing to tag your note with the timestamp of the call. This will attach to the Chorus recording, making post-call review efficient.
- Add 1-Click Pins: Easily bookmark key call moments live so you can stay focused. Review or share these key moments with your manager or peer to keep things moving. Click the Pin-shaped button next to the note editor. It will automatically tag the active moment with the associated timestamp for easy review and follow up
Use #Hashtags: Out-of-the-box tags push high-value moments such as #CustomerStories directly to a Chorus playlist taking knowledge sharing to the next level. Enter the # symbol in the note editor. Select from available hashtags the dropdown or start typing to auto-complete a hashtag you have in mind.
Using #hashtags will create a snippet of your call from your timestamp at time of hashtag which will be automatically added to a playlist dedicated to that #hashtag for you. Each time you use the same #hashtag, Chorus will add another snippet to the same #hashtag playlist which will be browsable by you and your team.
- @Mention Others: This tried and true Chorus functionality will be available within Zoom, so that you can bring in others during the call to get your deals over the line faster. Enter the @ symbol in the note editor. Select a team name or person from the dropdown or start typing to auto-complete a team or person you have in mind
- To delete a comment, @mention or #hashtag: Hover over a note in the list and click the X icon to delete the note. To edit a comment, @mention or #hashtag: Hover over a note in the list and click the pencil icon to edit the note. Save or cancel your changes.
Once you’re off your call, you’ll see all your notes, @mentions, hashtags and pinned moments already timestamped for you in Comments on the call review page in Chorus.
How to uninstall the Chorus App for Zoom Meetings
- Login to your Zoom Account and navigate to the Zoom App Marketplace.
- Click Manage > Installed Apps or search for the Chorus app for Zoom.
- Click the Chorus app for Zoom.
- Click Uninstall.
9. How to Prevent a Meeting from Being Recorded in Chorus
To prevent a scheduled call from being recorded by Chorus, there are a few options.
Proactively toggle recording off (or on) in advance
Head to the Chorus Home Page and check out the collapsable calendar pane. This will display your upcoming meetings and will show you which ones are set to record automatically and which aren’t. To turn off recording for a future meeting, simply toggle recording off.
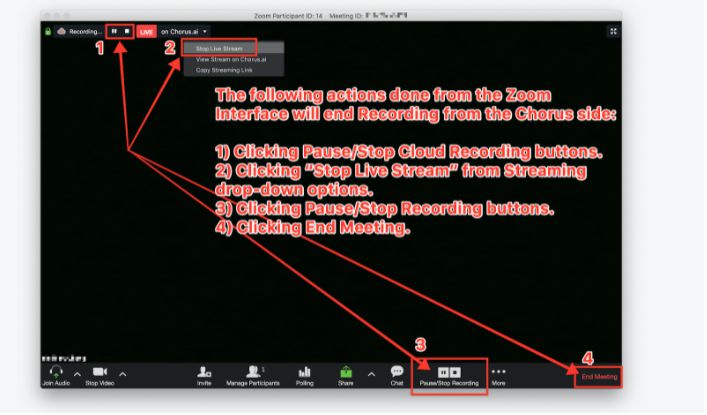
Stop Recording with Native Zoom
When using the Native Zoom Integration, the host of the meeting can stop recording by clicking:
Pause or Stop Zoom controls (see number 1 and 3 in screenshot below)
Note: pressing pause will permanently stop the recording. This is for compliance reasons — once Chorus has been asked not to record, whether it’s just part of a meeting or the remainder of one, Chorus must not be able to start recording in that meeting again.
- Stop Live Stream from Live on Chorus.ai dropdown (see number 2 in screenshot below)if the Pause/Stop Recording buttons are used from the Zoom Interface, Chorus will stop recording
- End Meeting (see number 4)
Remove non-video participants in your meeting room
Chorus may appear as a non-video participant in your conference meeting room as shown by the Chorus Notetaker.
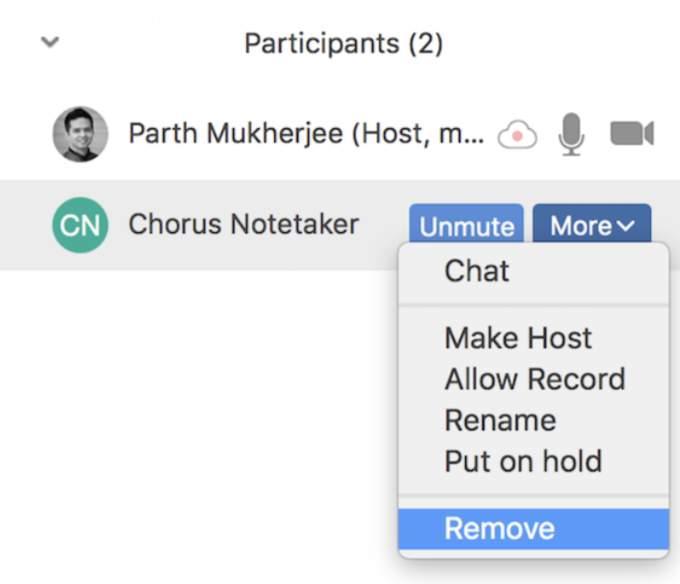
To remove Chorus, the host can follow these steps:
- In Zoom > Participants > More, click Remove to remove the Chorus participant
- Go to chorus.ai/record and select Disconnect
10. How to Add Chorus To a Meeting
Need to add Chorus to a last-minute or internal meeting?
There are a few ways to add Chorus to a meeting:
● Visiting https://chorus.ai/record
● Through the homepage
Visiting https://chorus.ai/record
Manually add Chorus by going to https://chorus.ai/record and inputting the conference link (e.g. Zoom link).

Through the Chorus homepage
Add Chorus to a live meeting by clicking on the button Add Chorus to a Live Call.
Double-checking an upcoming meeting? Use the toggle for each meeting on the homepage to add Chorus to future meetings. Must be at least 10 minutes before the meeting start time.
11. How to Import a Recording Into Chorus
Upload a single media file into Chorus with ease, allowing you to take full advantage of its transcription and analysis capabilities. It’s recommended to convert all files to .MP4 file types, if they aren’t already in this format, before import. See a full list of supported file types below. Simply import from directly within your Calendar on the Chorus home page, or from your settings page. This article will provide instructions for both methods.
How to Import from your Chorus Calendar
- From your Chorus Calendar, simply click on the video recording icon next to a historical meeting. A meeting message box will populate with an option to Import a
Recording. Note that this option is only visible once the meeting has passed. - Follow the prompts to import your recording by dragging a recording file into the box or browsing your computer files.
- Select Import. A Recording Settings modal will pop up with fields that have been pre-populated with meeting details found via your Calendar. Modify as needed, and
select to make your meeting private if you so choose. Your recording will be processed within 30 – 45min.
How to Import From Your Chorus Settings Page
- Click on your initials at the bottom of the left navigation bar.
- Select Import Recording at the bottom of the personal settings section.
- Select the .MP4 file you want to import and select Upload.
- Wait as the call is uploaded to the system, and then edit meeting details in the Recording Settings modal.
- Once the call is uploaded, it will take about 30-45 minutes to process speaker separation, a full transcript, and trackers. While processing, you will see Audio Only, but don’t worry, the rest is processing!
12. How to Find a Call in Chorus
If there is a specific call you’re trying to review but can’t find it, we’re here to help! There are three methods you can employ to locate a specific call.
- Was it a call or meeting that you owned?
The best place to locate calls you’ve personally had is the My Recordings page. This page will showcase any recordings you own, and will also display your upcoming meetings.
On the My Recordings page, you will see all of your recordings organized by most recent at the top. You can click into them from here to review.
To the left, you will see recording filters. Here, you can view Recording Info, Deal Info, Cold Call Central, and CRM details.
2. Was it a call that someone on your team had?
The best way to locate calls made by a team-member would be to go to the My Team’s Recordings tab. This will automatically display only your team’s calls in order of most recent.
3. Do you only remember a couple key words?
For searches that rely more on keywords such as customer name or name of the meeting, it is recommended to use the magnifying glass search function. It can be used to search for customer and prospect names, rep names, and even the title of your calendar meeting.
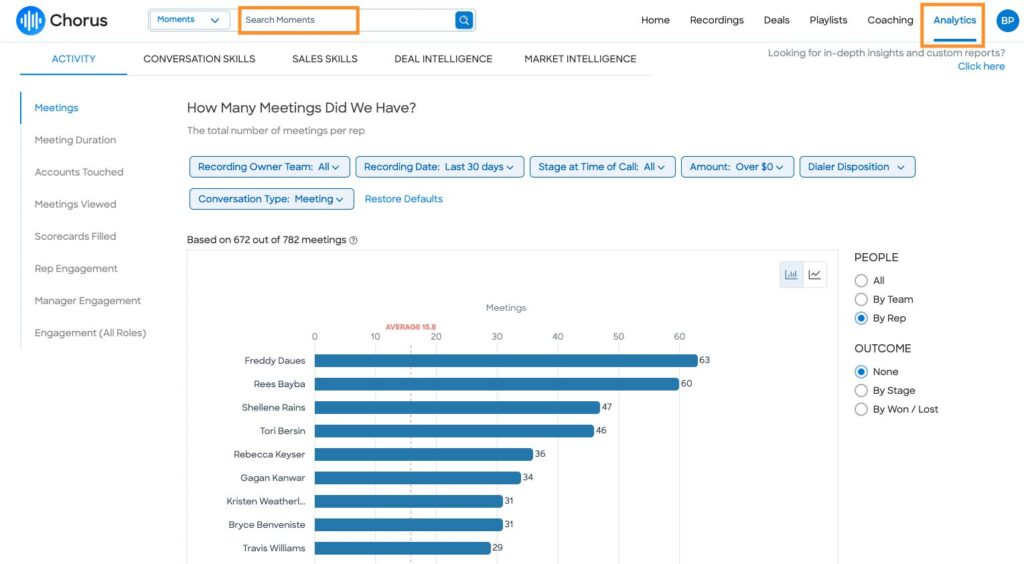
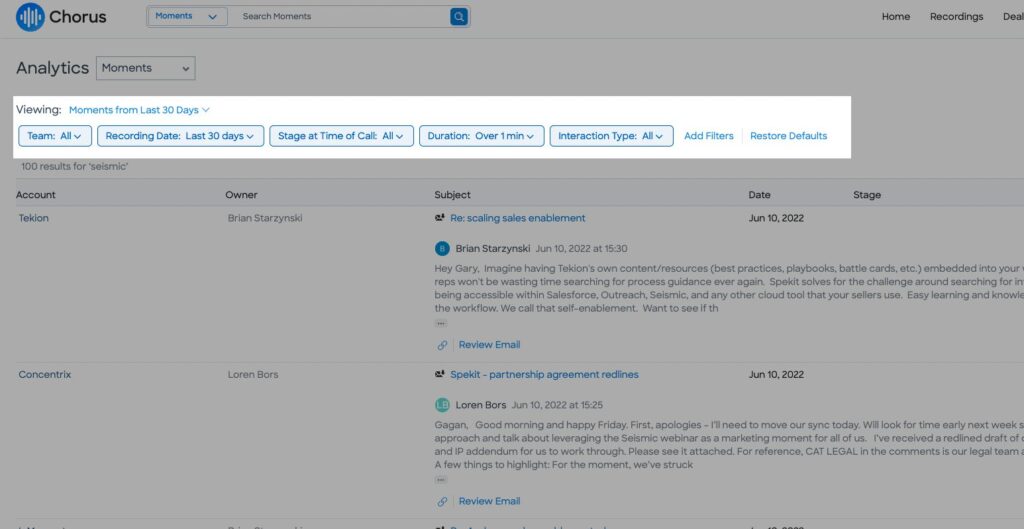
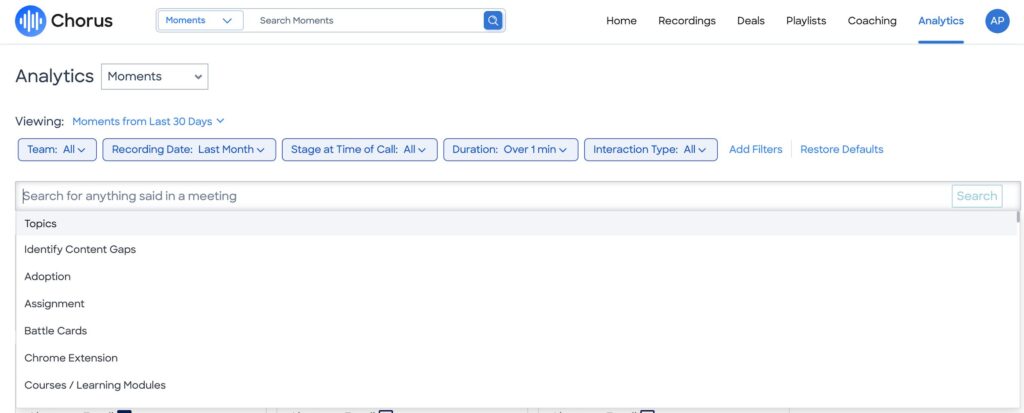
13. How to search Chorus Transcripts
To search for keywords in chorus recording transcripts, go to the “Analytics” tab at the top right and then you’ll be able to search for “Moments” to find the keyword. From there, you’ll be able to add additional filters for type of interaction (emails, recordings,
phone calls), date of recording, team, etc.
14. What are Chorus Trackers?
Chorus Trackers are a powerful tool to have Chorus automatically highlight the key moments in your sales conversations. They are designed to help you gather insights into how your team talks about the topics that matter the most to you. Each tracker is a keyword or phrase that you are interested in highlighting across the conversations your team is having, such as new features, competitors, and even discounts.
The Basics
A transcript of a call is composed of short transcription subunits called utterances. Each of these utterances is a textual representation of an audio piece that is usually 5-15 seconds long. You can think of an utterance as the equivalent of a spoken sentence, so if you pause significantly while speaking, Chorus will transcribe this as two separate utterances. As you might have figured, you can see them all in the transcript section for any of your calls.
When we search for Trackers in a call, it’s important to remember that it is these utterances that are being searched, one at a time. In other words, we look at each of the call’s utterances and run them through the query. If the query returns a positive result, the utterance is marked or caught, and will be displayed as a Chorus moment.
Tracker Categories
● Competitor: any language relating to a competitor such as a company name, a product they offer, etc.
● Feature: a particular piece or capability of your product
● Playbook: language relating to your specific sales playbook
● Value Language: related to pricing, discounts, etc.
● Other: get as creative as you like!
15. How to Find Trackers in Chorus
Before creating new trackers, check out the existing trackers already set up!
Option 1: Across Calls
To see how often a specific topic is coming up across conversations, head over to our Analytics suite. The first several tabs will show you how often topics like your competitors are coming up and which stage of the sales cycle they tend to come up in.
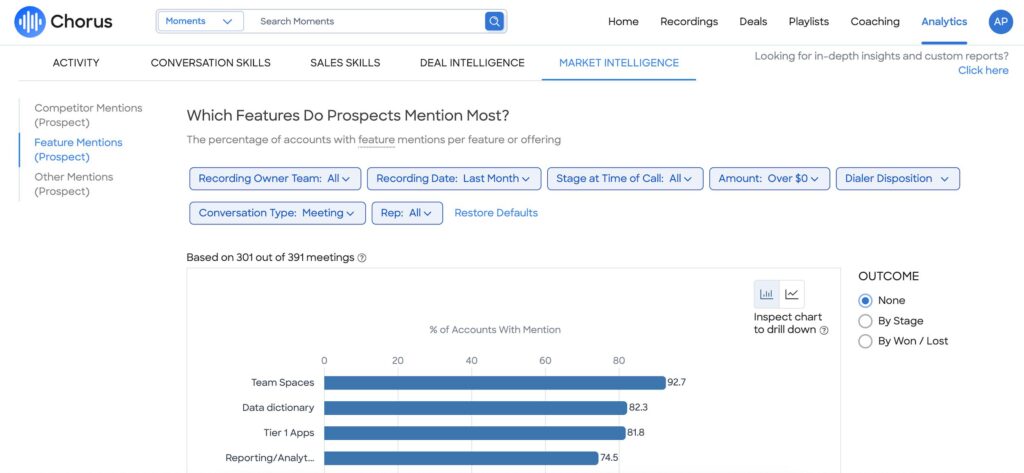
You can also search for any topic that’s top of mind, like Product Feedback or Discounts, by clicking on in-depth reporting, setting your filters to the right types of conversations (ex. sales vs CS calls for deals set to close this quarter), and searching your topic.
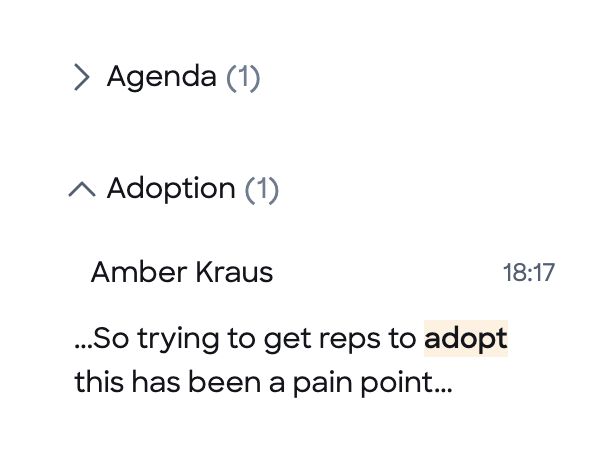
Option 2: Individual Call
If you click into a specific call, you can see your trackers by clicking into the search bar on the left-hand side:
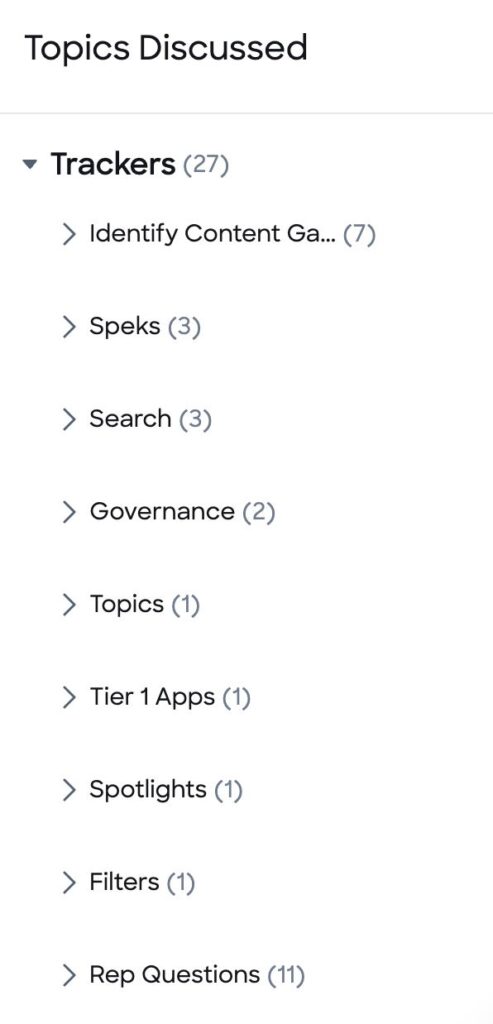
You can click on the tracker to see where in the call the keywords or phrases were mentioned, view a transcript, and listen to those individual moments
Option 3: Settings
Go to your Chorus Settings, and Click on Trackers. This will show you all of the Trackers Spekit has created.
16. How to Create Trackers in Chorus
Head to www.chorus.ai and sign in. Click on your initials in the top right and select Settings from the menu. Then navigate to the Trackers tab and select Create Tracker.
Advanced Tracker Tips and Tricks
Have more advanced tracking needs? The Advanced tab can help you set those up as well. This page is identical to the basics page, except the fields for Track These Keywords/Phrases and Ignore These Keywords/Phrases are replaced with one single field that requires boolean logic syntax.
When entering keywords and phrases to track and to ignore on the Basic tab, those commands are translated into boolean logic for you. On this Advanced tab, you are able to add to or edit the logic driving your trackers. By default, the Basics page deals only with “or” statements. For example, I want to see every time someone talked about cows OR pigs. This means I want to know about any time either cow or anytime pig was mentioned, and it doesn’t matter to me if only cows were talked about one time and just pigs another.
Tracker Search Terms
When you search for a term, it also searches for words that are grammatically related to it. For example, searching for the term work will also yield works, worked, and working in the results. This is helpful both because language is versatile and because both the ASR (automatic speech recognition) and a call’s audio are not always perfect, which may confuse these similar words in the transcription.
A search term is a unit of text. A term can be a single word (like brown or fox) or a phrase surrounded by double quotes (“brown fox”) where its words are searched in order. Capitalization is not required, so “Brown Fox” will get the same results as “brown fox”. Punctuation marks are also disregarded, so “brown-fox”, “brown fox?”, “brown.fox”, “brown/fox”, etc. are all equivalent. Remember that quotation marks should only appear around phrases, and anything between them will be regarded as a search term. This means that field names and operators should never be inside quotes.
Basic Operators
Search Terms (and fields) are connected by UPPERCASE operators.
Proximity
The ~ operator allows us to search for terms that are in a certain proximity, or distance, from each other. The distance is indicated by the number following the ~. Note that the ~ comes directly after the search term, without any space, and not followed by any
quotation mark. So, with the input format of “text phrase”~n, some examples could be:
- “give book”~1
- This will return “give book”, “give your book”, “give the book”, etc.
- “give me the book” will not be returned because here the distance is 2.
- “give new book”~1
- This will return “give the new book”, “give new fresh book”
- It will not return “give me the new fresh book” – distances accumulate, and the two
- distances of 1 here, are summed to a total distance of 2.
- A change of word order may also occur, and is counted as 2 distance unit.
- It’s recommended to keep proximity low (lower than 5). High n-values can slow down query performance and decrease reliability, as anything may come up between the specified terms.
Order of Operations
- To specify that this tracker only applies to the rep or the prospect, include “speaker=rep” or “speaker=prospect” before your search terms.
- (speaker=rep AND (“science” OR “astronomy”))
- To specify that this tracker only applies if it happens within a specific time range of the conversation–for example, an up front contract should happen within the first 10 minutes–enter the time in seconds using the following syntax: duration:<600
- (duration:<600) AND (“science” OR “astronomy”)
- (duration:<600) AND (speaker=rep AND (“science” OR “astronomy”))
- In many cases, the only operator used in the tracker is going to be OR. If this is the case, the order of the terms has no effect on results and parentheses are not necessary.
- “bonobo” OR “chimp” OR “orangutan” = “chimp” OR “orangutan” OR “bonobo”
- When combining different operators in a query, it’s always safe to wrap each of the OR-sections in parentheses.
- Good: (“bonobo” OR “chimp”) AND (“science” OR “astronomy”)
- Bad: “bonobo” OR “chimp” AND “science” OR “astronomy”
- The above rule applies to every use of AND and NOT. In order to get the desired results, place each of the arguments inside parentheses.
- (duration:>300) AND ((“scyther” OR “eevee” OR “chansey”) AND NOT (“rocket”))
- This will return any call that is at least 300 seconds long and contains at least one of the words: “scyther”, “eevee”, or “chansey”, and does not contain the word “rocket”.
- Without parentheses, the returned results will not be as expected.
Examples of Common Mistakes
Connecting phrases
- “Facebook” OR (“face” AND “book”)
- (“face” AND “book”) will catch any utterance that contains the words “face” and “book” in no particular order or proximity to each other.
- Should be: “Facebook” OR “face book”
- Another option: “Facebook” OR “face book”~1, if you want to account to words that might make their way into there, but that is generally unneeded for Competitor names.
- “Data coaching” AND “Data walk through” AND “walk through”
- Will catch only an utterance containing ALL of the above terms. In order to get any utterance that contains at least one of them, connect with OR.
Letters and numbers
- “abc” OR “a b c” OR “ay bee cee”
- Letter abbreviations are generally caught as one word, or several one-letter words.
- “abc” OR “a b c” should be enough to catch them
- You may experiment with “a be see” OR “a bee sea” etc., but only use those if results are improved.
- “3rd party” OR “15 dollars”
- The search function doesn’t find numbers. Numbers need to always be spelled out.
- Should be: “third party” OR “fifteen dollars”
- Tip: you might catch more results if you add OR “fifty dollars” to the above. The ASR is not perfect, and these are similar-sounding words.
Order
● (“dollar” OR “buck” OR “usd” AND “price”)
● Should be: (“dollar” OR “buck” OR “usd”) AND (“price”)
17. Emails Notifications from Chorus
You’ll receive regular email updates from Chorus, including:
Meeting Briefs are designed to help with pre-meeting preparation by delivering valuable data in a consumable manner. For easy meeting-prep, Chorus introduced actionable insights delivered to your inbox including:
- Upcoming meeting details and meeting link
- Internal and external participants
- Deal information with direct access to Momentum at the account view
- Last meeting
- Most recent email associated with the account.
You can now review recommended contacts in SalesOS with quick access to their Linkedin profiles.
Meeting Briefs also showcases firmographic and technographic information from ZoomInfo. Product Release Notes 3 This allows you to conduct more successful meetings and cultivate stronger relationships by seeing all key account activity in one place.
How it works:
Note: Meeting Briefs is on by default. To turn it off follow these steps:
- Go to User Preferences > Personal Settings.
- Scroll to Email Communication Preferences.
- Check the box for Pre-Meeting Summary.
Follow-up after customer meetings with meeting insights ready for review:
Includes a link to your call in Chorus, recommended next steps to use in your customer follow-up, a link to share the meeting with your team or manager, and a link to flag the call to your manager for coaching & feedback.
Team-specific highlighted snippets from the previous week:
Includes links to Last Week’s Top Viewed Snippets to review and learn from what your teammates are sharing.
The full list of emails you’ll receive:
- Pre-call meeting reminder | Sent: Real-time
- Post-call action items | Sent: Real-time
- Deal Alerts (if set up) | Sent: Daily (if criteria hit)
- Playlist Updates (if playlists are followed) | Sent: Daily (if criteria hit)
- Top Weekly Snippets Shared | Sent: 1x week
- Comment notifications | Sent: Real-time
- Snippet read receipts | Sent: Real-time
- Scorecard (if set up) | Sent: Real-time
In other scenarios, you may require an alert that is customized to your needs. Some examples may include:
- Alerts on product feedback and feature requests for your Product Team
- “How did you hear about us” alerts for your Marketing Team
- Alert if someone says your name on a call
- If a rep is on a call and the customer asks about the specifics of your Salesforce integration and the rep says, “Let me check with your Solutions Engineer, Julio, about this question,” Julio can then get alerted and listen to the exact moment it came up.
- The same is true for managers or leadership, for example: “I’ll connect with my manager, Samantha, about pricing options for you.”
Most Sales and Customer Success leaders want to be proactively notified when something noteworthy happens on a call (like if discounting came up in an early-stage conversation, or if a competitor came up in a renewal discussion, or if any of these topics came up on a deal over a certain size closing in the next 90 days). You can follow the steps below to create a custom tracker of your own.
- Ensure a tracker exists for this term. Luckily, common topics like pricing, discount, timeline, next steps, risks, decision process, and countless others are already created for you. Custom trackers can also be created for your competitors, sales methodology, your product features, and more.
- Navigate to Analytics > In-Depth Reporting.
- Enter your tracker as a search term.
- Set your filters to show results from the appropriate reps or teams, deal stage, deal amount, and more.
- Click the toggle for “Create Alert” and give your alert a name. You’ll get an email each day with a list of every call this topic came up on.
Want to customize your emails?
Use your personal settings in Chorus (found in Settings > Email Communication Preferences) to manage which emails you receive.
18. How to Use the Home Page in Chorus
When logging into Chorus, you’ll be taken to your Chorus Homepage which helps to seamlessly prioritize your day. The Chorus homepage streamlines how you interact with Chorus by
providing the most valuable & actionable insights at your fingertips to maximize your time and impact. The Chorus homepage helps you:
- Prioritize your day and tasks with easy access to your calendar including call & deal context
- Learn from peers and self-coach with quick access to your team members’ calls
Your Chorus Homepage has two views: one for Reps and one for Managers.
- The Rep view allows individuals to understand their daily activities at a glance and quickly access their team’s calls.
- The Manager view which includes all non-rep roles, provides additional insight by showcasing your team’s activity and schedules to know where to focus your time.
Your Chorus Homepage is designed with two distinct widgets: Calendar and Team. With the Calendar widget,
- Review upcoming calls: preview whether they’re set to automatically record, toggle recording on for a call in advance, or 1-click add Chorus to an in flight meeting
- Easily access completed calls: we made it easier than ever to get quick context, review the meeting, or 1-click to share a snippet of your whole call. Simply click on a previous call and voila!
- Managers can view their teams’ schedules: Search for an individual rep’s calendar and stay up-to-date on your teams’ recent calls, and to check out what’s coming up across the team. Use the calendar widget to know where to focus your time and provide fast feedback on call activity.
With the Team widget:
- See how your activity as a Rep stacks up to your team: On the right-hand side of the screen, we make it easy to learn from your peers and see where you stand against your team.
- Managers know where your team stands: With one-click access to your team’s recordings, understand what the call volume looks like across your team in the last 7 days and easily provide coaching to those who need it the most.
TIP: Use the home page to view recorded meetings from previous days.
19. How to Use the Recordings Page in Chorus
In Chorus, the Recordings page is designed to help coordinate follow-ups from recent calls, prepare for upcoming meetings, organize calls by deal stages, amounts and close dates, and more! When you access the Recordings page there are many ways to view historical call data with filters and columns.
Use Cases:
- Coordinate follow-up for a recent call
- Prepare for an upcoming meeting
- View next steps from past calls
To access your options click the two arrows in the top left corner to expand the panel. Here you’ll see Filters and Columns at the top. Filters will refine your results, there are four main
filter buckets: Recording Info, Deal Info, Cold Call Central, and CRM. Columns let you manipulate what data you see in your results, there are two main column categories: Cold Call Central and Trackers.
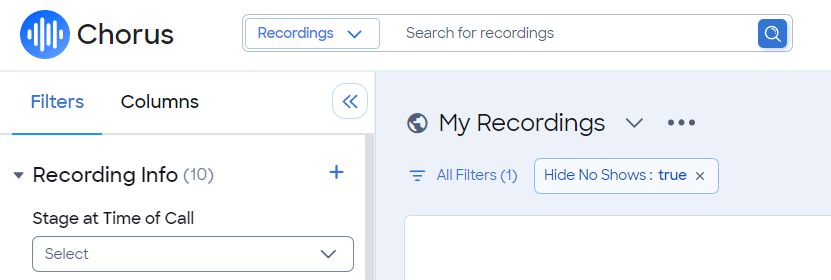
Filters
The Recordings page shows all of your recorded calls, ordered with the most recent one first. You can take a look at your Next Steps directly from there by simply clicking on any of the bubbles under the Trackers column. Additional filters you can apply include the following:
- Recording Info filters allow you to further refine your search results by stage at time of call, team, rep, recording date, duration and more.
- Deal Info consists of current stage, amount, and close date options.
- Cold Call Central allows you to choose to view connected, phone tree, gatekeeper, or voicemail results.
- CRM allows you to add filters from your connected CRM tool.
TIP: Top-performing reps end every call with clear next steps. If you end your calls by saying “Our Next Steps are X,Y,Z..” Chorus will automatically pick them up. No need to waste time scribbling everything down in a notebook, or trying to remember them after you come back from lunch!
Columns
If you’d like to edit the columns in your Recordings report you can choose from Cold Call Central or Trackers. Simply click the plus icon next to either option to add an additional column.
Cold Call Central
Chorus’ industry-first Cold Call Central powered by Chorus’s Smart Call Disposition provides SDR Leaders, SDRs and self-prospecting AEs insights into cold calls to drive “booked” meetings and top of funnel results. This customizable view in Chorus surfaces actionable insights that enable SDR teams to surface top-performing talk tracks, enrich 1:1s by providing specific examples on where to coach, build a strategy around improving connection rates, and drive better alignment between SDRs & AEs.
Using advanced AI, Chorus quickly and easily diagnoses where you could improve to drive more booked meetings through quality conversations. The options in the Cold Call Central menu include:
- Connected: A call is defined as ‘Connected’ if the caller is connected with the intended prospect
- Phone Tree: A phone tree is an automated calling system that typically included touch-tone menus to route callers
- Gatekeeper: A gatekeeper is defined as someone other than the intended prospect. This is usually a live operator or assistant.
- Voicemail: The call results in a voicemail message
- Dialer Disposition: The Smart Call Disposition feature helps SDR managers and leaders get accurate insights into their team’s calls. This AI-based technology reports if the call
- was fielded by a gatekeeper, a phone tree, or sent to voicemail (at >95% accuracy). This data helps managers build a strategy around improving connection rates and contact data quality.
Trackers
Trackers are designed to help you gather insights into how you or your team talk about the topics that matter the most to your business. Each tracker is a keyword or phrase that you are interested in highlighting across the conversations your team is having, such as new features, competitors, and even discounts. Clicking the plus icon next to Trackers will allow you to add additional columns with the Trackers you select.
20. How to Use the Deals Page in Chorus
Deal reviews require much prep time, which means less time for selling. They are also notoriously challenging because the information you need might be scattered across several locations, from the brains of your reps to your CRM and other places. Even the best reps can’t remember every single detail about what happened during every communication within a deal.
Use Cases:
- Get complete and accurate data to craft a realistic view of whether a deal has stalled and needs support
- Hear the voice of the customer firsthand to assess the likelihood of closing
- Inspect deals set to close this month or quarter before committing your forecasts
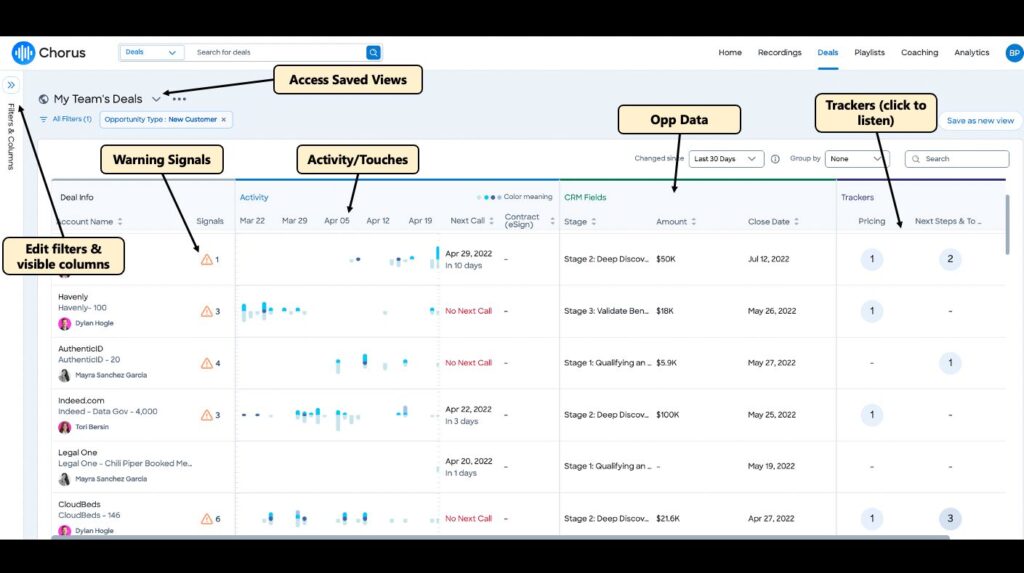
Momentum minimizes the risk of critical information falling through the cracks and derailing a deal (and your forecast) by providing greater visibility into all deal-related communication. Whether you are a rep or a manager, there are three pieces of information that affect the course of a deal: what, when, and who. Momentum is designed so you can get the answers to these exact questions. Momentum is the Deal Info, Activity, and CRM Fields.
Use filters and show different columns to get to the view that you want (which you can save for easy access). For example, you could save a view of your Type = New Customer opportunities with Close Date = This Quarter to drive conversation during your 1:1s.
NOTE: If you notice missing ‘touches’ in this view, ensure that your calendar and email are both synced with Chorus.
Customizing Pipeline Views
When you first open the Deals tab, you will see a pipeline-level bird’s eye view of open opportunities with a preview of activity and engagement. Use this overview page to get a sense of your pipeline health to accurately forecast.
Your pipeline view is fully customizable through custom columns. You have the ability to add columns based on your unique CRM fields and data you care about. You can also add trackers to see which topics are being discussed at the deal/opportunity level.
- On the left-hand side, click on the arrows in the Filters & Columns pane to expand.
- Filter your view with Deal Info or CRM filters.
- By clicking on the Columns tab, you are now able to add the columns you’d like to see
in your dashboard. - For CRM fields, confirm your CRM is connected to Chorus in order to access it.
- To add Trackers, click the (+) and select which trackers you’d like to see in your dashboard.
- To customize, drag and drop the fields/columns in the order you’d like to see in your dashboard.
- Once you have the data you care about, click Save as New View in the top right for private (just visible to you) or public use (visible to your team).
Leveraging Trackers
Trackers are designed to help you gather insights into how your team talks about the topics that matter the most to you. Each tracker is a keyword or phrase that you are interested in highlighting across the conversations your team is having, such as new features, competitors, and even discounts.
The tracker column shows the total mentions of the specific tracker you’re viewing. Click into the bubble for the preview pane to showcase the exact moments in each call the tracker surfaced. Review the call without leaving the page or clicking out to review the entire meeting.
Using Momentum Signals
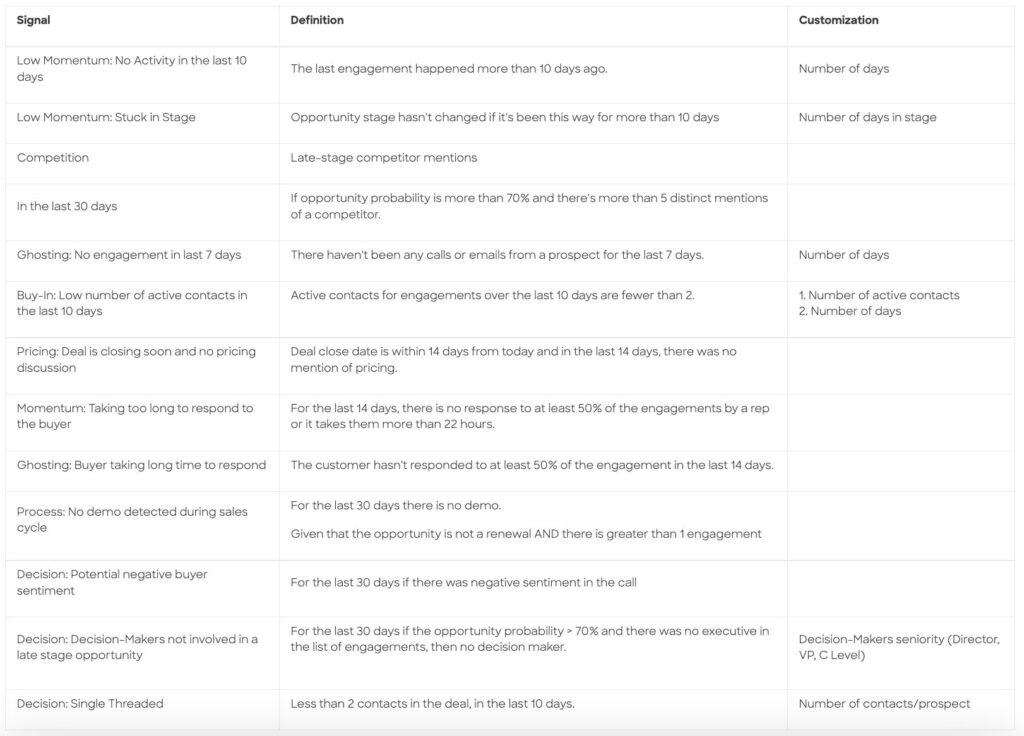
By clicking on the Deals tab in the top navigation, your pipeline view is more powerful, allowing you to know at a glance which deals need your attention. You have access to key risk alerts that surfaced in your pipeline view, along with added customizations to guide a better outcome. These risk alerts are based on activity, CRM data, and first hand conversation insights.
The following risk alerts are available and are surfaced in the Deal Info column when detected.
From the Accounts row, click the drop-down arrow next to the account name. You can either zoom out to all opportunities with this account or choose to focus on a specific one. You will then see a dynamic timeline of customer interactions (content, calls, inbound emails, outbound
emails), including the deal stage in which the interaction took place.
- On the left side, you can see contacts who have been engaged with, when the last touch was, and number of calls and emails exchanged with a particular individual. Click on a of particular person to see the interactions with only them.
- Under the timeline, you can see more details about the specific interaction, such as a list of calls and emails. When searching the timeline for key topics, this section will display transcript excerpts of the search term.
- You can search the timeline for any tracker in your account, or use the 50+ patented, pre-built trackers provided automatically for you, such as Next Steps, Discounts, Budget, Pricing, Risk and more. You will see when on the timeline this subject came up, who this subject came up with, and see a transcript of that exact moment. Optional: filter those results by a specific person (ex. Decision maker).
Pipeline and Deal Inspection
While simply relying on high-level forecasting numbers may be standard, this page of the platform will support your understanding of each deal or account on a deep and fundamental level, just as if you were in every interaction with firsthand conversation and relationship insights. Try some of the following strategies when inspecting deals before committing your forecasts.
- Get a general sense of how much interaction there has been. Are there many calls? Is your rep sending the right volume of emails? Is the customer replying to those emails?
- Use the search bar to look for risk (ex. Risk, Budget, Competitor mentions) as well as commit language (ex. Contract, Commit/Move Forward, Pricing)
- Incorporate into your 1:1s
- Gain a clearer view into whether you need to loop in additional stakeholders to help win the deal. Reps can pinpoint where they need support with complete visibility into who is involved in their deals and what topics they care about.
- Have your reps proactively identify an opportunity they are working on and prepare questions on strategy. Use this view to help understand what interactions to-date have looked like and what can be done to improve the likelihood of the opportunity closing.
- (For example: we’re not engaging the right people / titles, we haven’t discussed a multi-year agreement yet, there are unresolved legal issues, etc.)
21. How to Use the Playlist Page inChorus
A powerful tool for reps, managers, and enablement leaders alike, Chorus Playlists allow you to seamlessly create and organize playlists of top moments with folders and subfolders and find and review calls on-demand. They provide an easy way to curate content for team training within your organization and allow you to save a collection of snippets in one place, either with the purpose of sharing with your team or for your own knowledge.
There are three different kinds of Chorus playlists:
- Playlist: A curation of calls or call snippets that has been manually created. These can be public or private. This includes personal playlists. Use playlists for Film Reviews, Onboarding, 1:1s, and more.
- Smart Playlist: A curation of call snippets that has been AI-generated. End users select the criteria they wish to include and calls that fit the criteria automatically get added. These can be public or private.
- Hashtag Playlist: A curation of call snippets that has been curated through the use of hashtags. Every time a #hashtag is used, snippets get added to a public playlist.
To pin or bookmark playlists you’d like to reference or save for review later, add them to one of your personal playlists:
- #MyPinnedMoments: Pin important moments with 1-click using #MyPinnedMoments during and after a call.
- My Bookmarks: Bookmark moments that you need to reference after a call or reference frequently.
Use Cases:
For Reps and Teams:
- Listen and learn from top examples of engaging Discovery calls
- Uncover a list of “Wow!” moments
- Learn how top reps close deals by auto-collecting and reviewing the best examples of the sales process
For Managers and Sales Executives:
- Flag high-risk calls from accounts that may need attention
- Collect competitive mentions on top-tier deals
- Create a Playlist for your team film review sessions that includes the week’s most interesting Discovery calls
For Enablement, Ops, and Marketing:
- Track new sales training initiatives–share good examples with the team to reinforce learning
- Capture customer testimonials that could be augmented into marketing material or customer story points for the sales team to share in future deals
- Review how the sales team approaches pricing discussions in deals
22. How to Create, Manage, Organize and Share Chorus Playlists
How to Create a Playlist
- In Chorus, click Playlists.
- In Playlists, select +New Playlist.
- Name your playlist and click Save.
- Add existing and new recordings or snippets to the playlist.
How to Add Moments to Playlists
You can add an entire call to a playlist or use the clipping functionality to add a specific moment to the playlist.
In Chorus, go to a call recording.
- In the recording, click the arrow next to Share on the top-right of the video player.
- Select Add to Playlist.
- Using the video cropping tools, you can pair down the recording to a snippet to share a moment from the call or slide the cropping tools all the way out to the sides to keep the whole recording.
- Double-check the Share Recording or Snippet details.
- Under Edit Snippet Start & End, you can see the length of the snippet or
recording. - Under Select Playlist, choose the Playlist.
- Under Description, add
- Click Save & Add
How to Follow Playlists
Follow playlists (subscribe) and sign up for a daily morning digest email that will surface any new calls or moments that have been added to your playlist. Sign up for multiple playlists–don’t worry, you’ll only get one email a day.
This is great for busy managers that want a list of calls they should listen to on the way to work!
- In Chorus, click Playlists.
- Search for keywords or through the list for the respective playlist.
- Click on the playlist.
- In the playlist, click Follow at the top right.
- Following a playlist adds it to the Following section in Playlists.
How to Share Playlist Access
Share playlists to give your team access to all the calls in a given playlist. Sharing is great for new hire onboarding and ongoing training initiatives.
Things to note when sharing:
- By default, new playlists are private and not publicly accessible
- Playlists can be shared individually, with specified teams, or made public (accessible to ALL current and future users in the platform)
- For Admins: Admins can control which users are allowed to share playlists using the Roles & Permissions section of Settings
Follow these steps to share a playlist:
- In Chorus, click Playlists.
- Search using keywords or through the list for the respective playlist.
- In the playlist, click Share at the top right.
- Type and select the User(s) or Team(s) to share.
- Click Share.
Please note: To make the playlist public, click the toggle to the right of Make Publicly Available.
How to Manage Playlists
Playlist owners can update the playlist name and owner, move the playlist into other folders, and delete playlists. If a playlist is deleted that contains subfolders, those subfolders will also be deleted.
Follow these steps to manage playlists:
- In Chorus, click Playlists
- Search using keywords or through the list for the respective playlist
- Click on three dots next to the playlist, and choose to Edit Playlist, Move To another playlist folder, or Delete
Organizing Playlists & Playlist Permissions
The Playlists page is default organized by most recent activity. This means that any playlist that has been modified or created most recently will be at the top of the page. However, you can sort by Updated Date, Playlist Owner, and Number of Snippets.
- If a user has access to a playlist, they can add snippets to the playlist.
- For example: You provide team members access to a playlist, and they can now add snippets.
- Subfolders can have wider sharing permissions than their parent folder.
- For example: A subfolder is added to a playlist that is only shared with 3 people. The subfolder can be made public, while the top-level folder (playlist) remains visible only to the 3 people it was originally shared with. Everyone will be able to see the contents of the sub-folder but not the top-level folder.
- When creating a subfolder, it will be shared with the same users as the top-level folder (playlist) it is nested beneath.
- For example: If a top-level folder is made public, all subfolders created under that playlist will also be public. This is helpful for content you wish to organize but keep available to your entire organization.
- If the subfolder is nested under 1 or more subfolders, it will be shared with the same users as the folder it is nested under.
- For example: If a top-level folder is only shared with the sales team and a subfolder is created, by default it will also be shared with the sales team.
- Playlists owners can share subfolders with additional teams but still limit access to the top-level folder.
- For example: The playlist owner can share a subfolder with the Marketing team. The marketing team would have access to the subfolder but not the original top-level folder. However, the team that has access to the top-level folder can also view sub-folder playlists.
Please note: If playlist privacy is a concern, please reach out to your CSM to ensure your specific requirements are met.
How to Create Subfolders and Manage Nested Folders
For teams with multiple functional groups (ex. NA Enterprise AEs, EMEA Corporate AEs, etc), Chorus offers Playlist Folders and Sub-Folders to help organize your Playlist content by function, market segment, and type of conversation.
- In Chorus, click Playlists.
- Create the top-level Playlist folder first (ex. Enterprise Team).
- In the Playlist folder, click +Create Subfolder to create your first nested folder.
- Type in the subfolder name and click Save. (Example use case: North America AEs, EMEA AEs, Global CSM).
To manage a subfolder, simply search within Playlist using relevant keywords, and select the three-dot menu to “Move To” another location. In the pop-up window, choose the new playlist under which you would like to nest the selected playlist.
23. How to Use Smart Playlists in Chorus
Smart Playlists are composed of call snippets that have been AI-generated, meaning Chorus will automatically add relevant moments to your playlist for you.
Select the criteria you wish to include and calls that fit the criteria automatically get added to Smart Playlists.
Things to note:
- Smart Playlists can be public or private
- Smart Playlists add both existing (old) calls and new calls to the playlist
Follow these steps to create a Smart Playlist:
1.) In Chorus, click Playlists
2.) In Playlists, select the drop-down icon to the right of +New Playlist
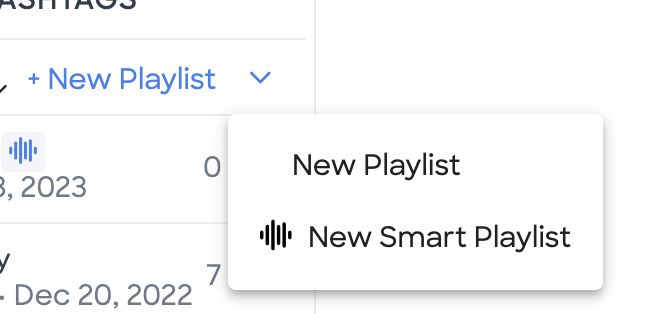
3.) Select New Smart Playlist
4.) Name your playlist
5.) Using the Recordings, Deal Info, and Things Said In A Meeting (Trackers) filters, add your playlist criteria
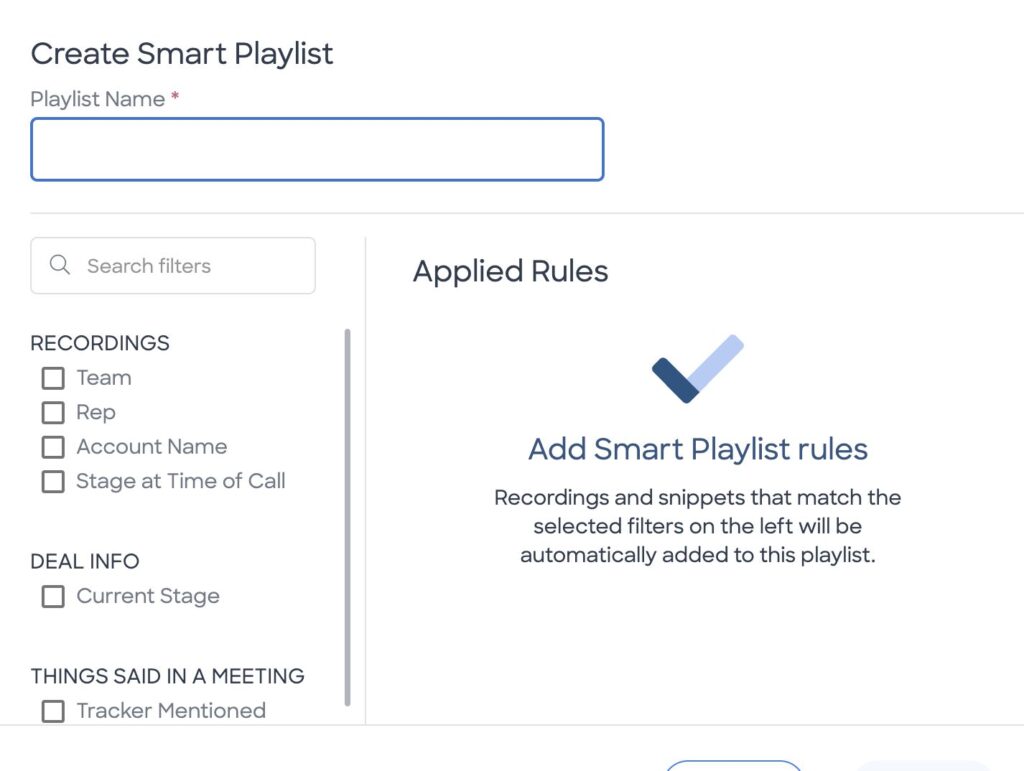
6.) Click Save
7.) Chorus will auto-fill the playlist based on the criteria you set with the most recent 100 moments.
24. How to Create Hashtag Playlists in Chorus
Similar to how #hashtags are used across common social media platforms, users can tag moments of calls with the relevant #hashtags (i.e. #Wins, #Discovery, #ProspectQuestion, etc.) so other users can easily discover and review those moments as they explore different #hashtag playlists.
To get things started, Chorus has added 22 out-of-the-box #hashtags (with common sales terms like #ProspectQuestion and #Pricing) to help drive initial adoption and discovery:
#ActionItem, #Agenda, #Budget, #CompetitorMention, #Demo, #Discounting, #Discovery,#EngagingQuestion, #FollowUp, #Goals, #Needs, #Negotiation, #NextSteps, #Notes, #Objection, #OpenQuestion, #Pricing, #ProspectQuestion, #Research, #UncoveringPain,#Wins, and #MyPinnedMoments
Use Cases:
- If you need help driving the adoption of a particular sales methodology your team uses, leverage hashtags for that specific methodology for your team to tag
- To increase collaboration for things like weekly spiffs to identify call moments that fit certain criteria (best customer/prospect shout-out, funny moments, etc.), leverage hashtags for your team to tag
There are two ways to create Hashtag Playlists:
- While reviewing a call
- Live Note-Taking in the Chorus App for Zoom Meetings (coming soon)
Please note: Snippets can only be added to Hashtag playlists using comments.
Call Review: Creating Hashtag Playlists & Adding Snippets to Hashtag Playlists
The following steps outline how to create hashtag playlists and add snippets to hashtag playlists.
While reviewing a call:
- Select Comments at the top of the screen
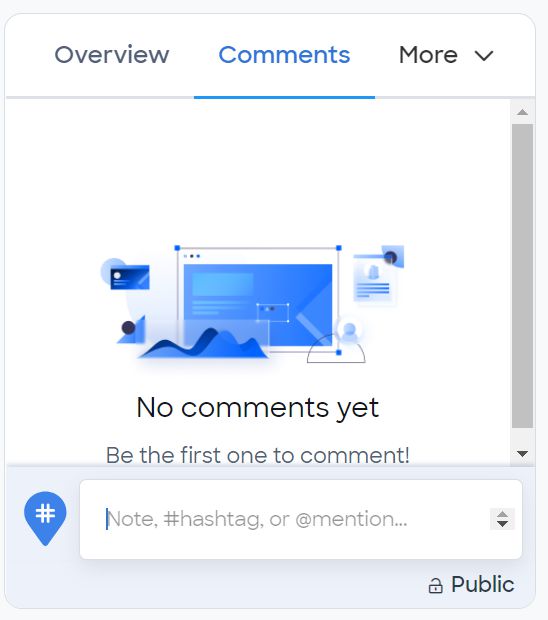
2. In Comments, type the hashtag symbol “#”
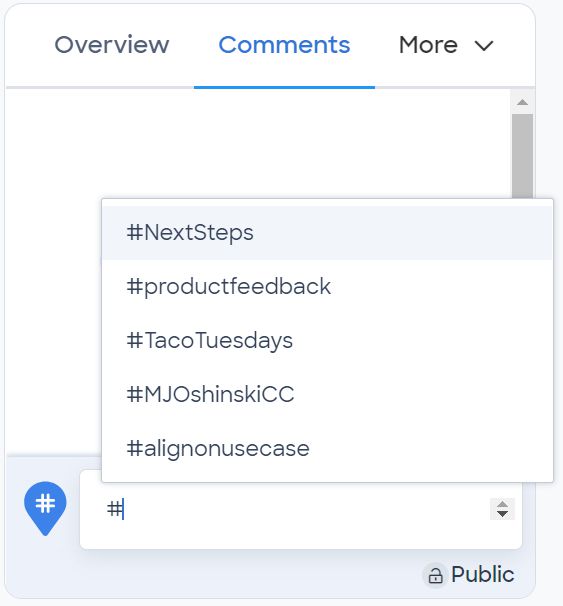
- Choose one of the existing hashtag options in the drop-down list or type in a new, custom hashtag. (Example: If you’re tagging a call about pricing, use the #pricing tag)
- Once you’ve chosen the hashtag, click Comment
- To see the playlist, click on the new comment with the hashtag. The exact moment you tagged in the call is added to the playlist associated with the hashtag
Live Calls: Creating Hashtag Playlists & Adding Snippets to Hashtag Playlists (Chorus App for Zoom Meetings coming soon)
The following steps outline how to create hashtag playlists and add snippets to hashtag playlists.
While on a live call with Chorus recording:
- Select Comments
- In Comments, type the hashtag symbol “#”
- Choose one of the out-of-the-box hashtag options in the drop-down list or type in a new, custom hashtag. (Example: If you’re tagging a call about pricing, use the #pricing tag)
- Once you’ve chosen the hashtag, click Comment
- The exact moment you tagged in the call is added to the playlist associated with the hashtag
Viewing Hashtag Playlists
- In Chorus, click Playlists
- In Playlists, select the Hashtags tab
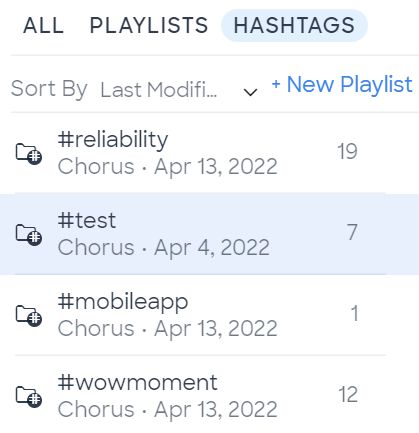
3. Under Hashtags, select the playlist with the respective hashtag
Please note: Hashtag playlists are public to all users and cannot be made private.
Managing Hashtag Playlists
- Hashtag playlists can be deleted by admins only. Deleting a hashtag playlist removes all snippets that have been collected to that point.
- If data access is enabled, snippets visible to users will adhere to the data access rules that are in place in your instance.
- Example: If a particular user doesn’t have access to a meeting in Chorus (not on the same team, etc), no snippets of hashtagged snippets would be visible to them in hashtag playlists either.
