Salesforce Pardot - Processes Template
Customize this training to give your go-to-market teams the process guidance they need directly within Salesforce Pardot.
1. Build a Landing Page in Salesforce Pardot
Creating a New Landing includes the following processes:
- Creating a Landing Page
- Selecting a Form
- Selecting the content layout
- Confirm and Save changes.
To build a new landing page, follow these steps:
Creating the Landing Page
Selecting a Form
- Select Create new form to launch the Form Wizard.
- Click Next.
- Enter the form’s Name.
- Click Next.
- Click +Add New Field.
- Select a custom field.
- Click Next.
- Select the Standard Form form layout template.
- Click Next.
- Leave the form’s thank you content as the default settings and click Next.
Selecting the Content Layout
- Select Stock Templates to preview Pardot's pre-formatted stock template options.
- Select the Start from Scratch template.
- Select Form and drag it to the center of the builder. This automatically populates the form.
- Choose Page Options to make general changes to the whole page.
- Click Next.
Confirming & Saving
- Review the confirmation page to finalize your landing page.
- Select Preview Landing Page to view the page before saving.
- Click Confirm & Save to save your work.
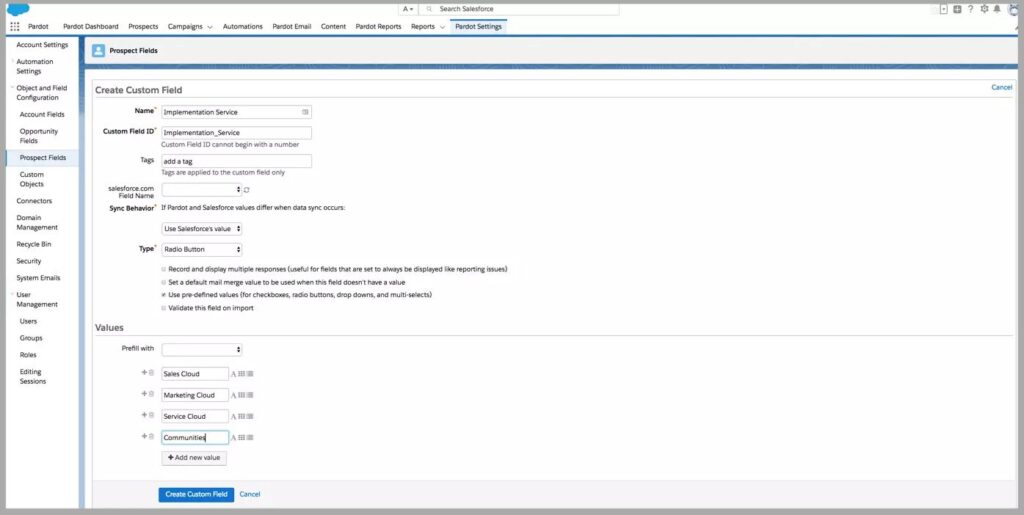
2. Create a Custom Field in Salesforce Pardot
To create a custom field, follow these steps:
- Navigate to Pardot Settings.
- Open the drop-down for Object and Field Configuration.
- Click on the Prospect Fields tab.
- Click + Add Custom Field.
- Enter the Name field.
- Leave the Custom Field ID as automatically generated.
- Leave Sync Behavior as is.
- To limit responses, change the field type to Radio Button.
- Under Values, enter the values for the field.
- Click Create Custom Field to save your new field.
You could have accessed this content directly within Salesforce Pardot
All this content (and more) is available to import and surface in your own Salesforce Pardot instance with Spekit. Give employees the bite-sized training, documentation, and knowledge they need – where and when they need it.

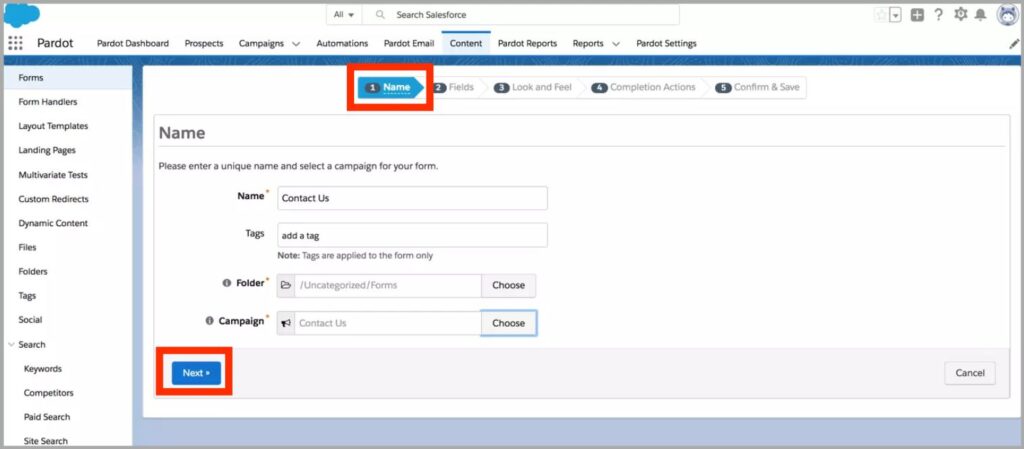
3. Create a Form in Salesforce Pardot
To create a form, follow these steps:
1. Navigate to Content.
2. Select the Forms tab and click +Add Form.
3. Fill out the information in the following sections of the form.

Section 1 - Name:
- Enter the form’s name.
- Click Choose to select a folder. Select the Forms folder within the General folder and click Choose Selected.
- Click Choose to Select Contact Me campaign then click Choose Selected.
- Click Next.
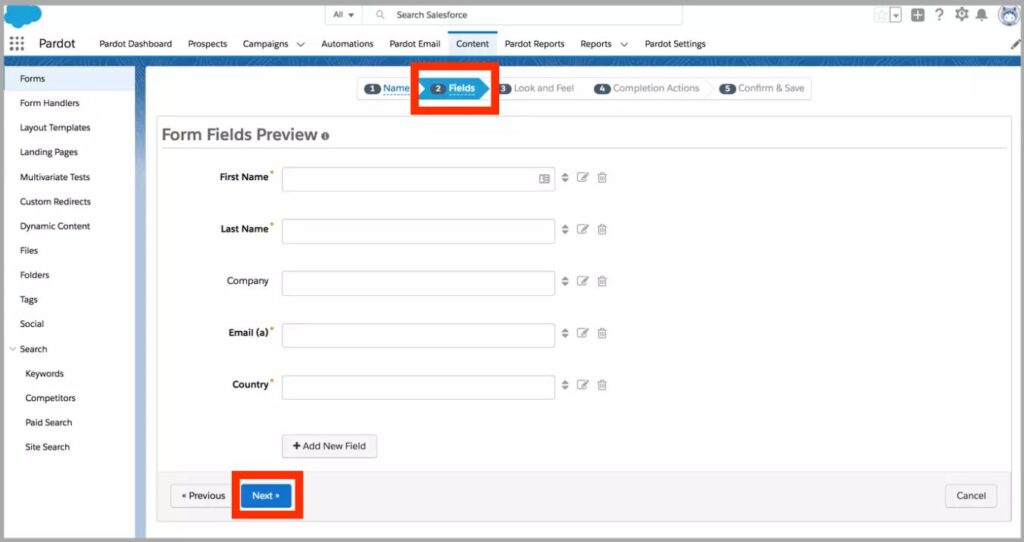
Section 2 - Fields:
- Click + Add New Field.
- Select Country from the list of prospect fields.
- Click Load Default Data next to the Country field to automatically load in a list of Countries. Then click ok from the pop-up prompt.
- Note: You can use the tool icons to edit, rearrange, and delete fields.
- Click Save changes.
Section 3 - Look and Feel:
- Click Next.
- Select the Standard Form layout template.
- Click Choose Selected.
- Enter text you would like displayed for the Submit Button Text.
- Leave the Above Form, Below Form, Styles, and Advanced tabs as is, and click Next.
Section 4 - Completion Actions:
- On the Thank You Content tab, enter text that you would like displayed after the prospect submits the form.
- Click Next.
4. Click Confirm & Save to save your form.
4. Creating Prospects in Salesforce Pardot
Prospects in Pardot are created in a few different ways. The most common method is when a visitor submits a form containing their email address.
This can happen through three different avenues:
- Embedding a Pardot form on your web page.
- Connecting a form on your site to a Pardot form handler.
- Hosting a form on a Pardot landing page.
These methods make it easy for visitors to provide their email address and other information, effectively converting them into identified prospects.
5. Custom Redirects in Salesforce Pardot
Pardot's custom redirects enable you to track links on your website or external sites and provide access to files hosted outside of Pardot. When a prospect clicks on these links, it is recorded as an activity on their record.
You can also add completion actions to custom redirects to automate actions based on the clicks. Additionally, you can view a list of prospects who clicked on a specific link. If you use Google Analytics parameters, they can be integrated into the link creation process.
Page actions are completion actions triggered by a prospect's page views. These actions can be applied to any page that has your Pardot tracking code implemented.
To evaluate the performance of custom redirects, you can refer to the custom redirect report. This report displays click data in the Custom Redirect Statistics table, which can be filtered by tags, campaigns, and date ranges.
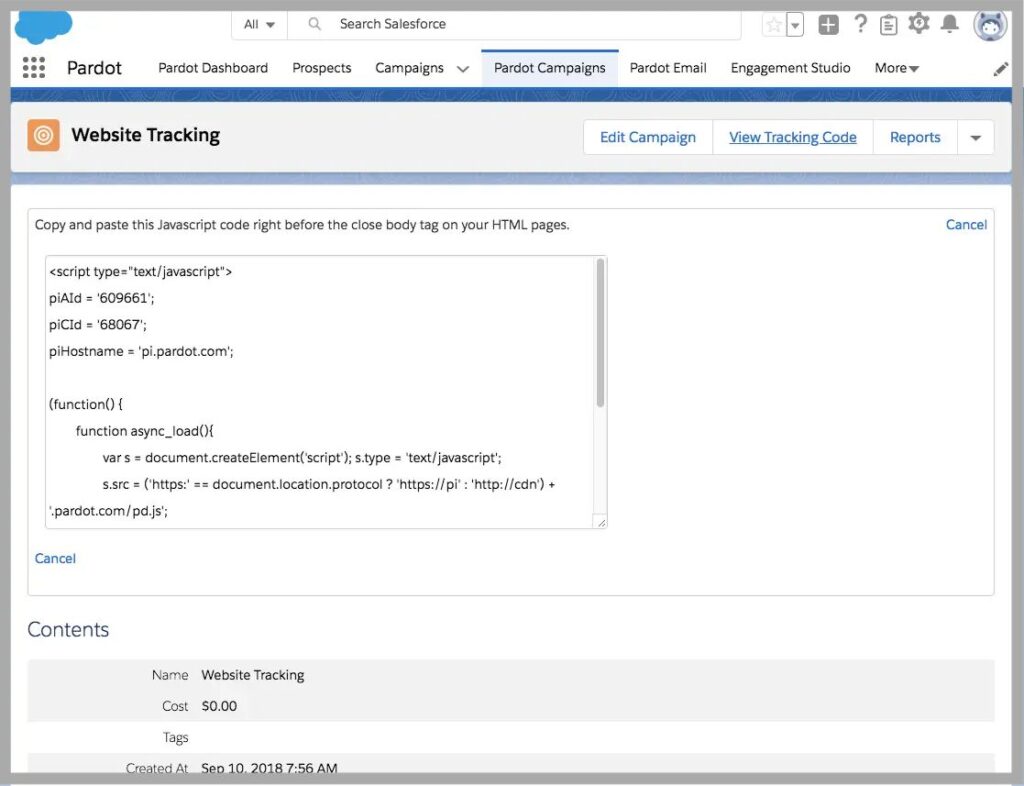
6. Finding Your Pardot Tracking Code in Salesforce Pardot
To start the process of setting cookies for site visitors, you will need to add a Pardot tracking code to your website.
Before accessing your tracker, you will need to add the Pardot Campaigns tab. Click the App Launcher in the top left corner and enter Pardot Campaigns to search for the tab.
To access your Pardot tracking code, follow these steps:
- Click the Pardot Campaigns tab.
- Select the Website Tracking campaign.
- Click View Tracking Code to access the unique Pardot tracking code for your website.
- Copy the code.
- In your web page HTML, paste the campaign tracking code before the close body tag(</body>).
7. Pardot Tracking Cookies in Salesforce Pardot
Pardot's tracking code allows you to gather information about visitors even before they convert. By placing a tracking cookie on their browser, Pardot can track their interactions and activities on your website. This cookie includes a unique identifier for the visitor and your account, enabling the storage of their browsing behavior.
There are two types of cookies set by Pardot:
- Visitor Cookie: This cookie stores the visitor's unique identifier and tracks their activities on your site, linking them to specific visitor and prospect records.
- Opt-In Cookie: Pardot uses a persistent cookie called "pi_opt_in" to comply with the "Do Not Track" initiative. It allows individuals to opt out of certain browser tracking.
These cookies remain on the visitor's browser unless they choose to opt out.
Once a visitor converts into a prospect, these cookies provide valuable information about their interests, behavior, and activities. Pardot keeps this visitor data and appends it to the prospect's Pardot record, allowing ongoing monitoring of their activities.
8. Prospect Audits in Salesforce Pardot
Each prospect record has an audit table displaying the prospect’s actions.
On the Audit page, you can see all the data collected by Pardot as prospects provide information. The audits display the action name and the specific changes made to the prospect record. Each audit includes details about the type of change and the date it occurred.
By clicking on the field name, you can access more information about specific fields and audits.
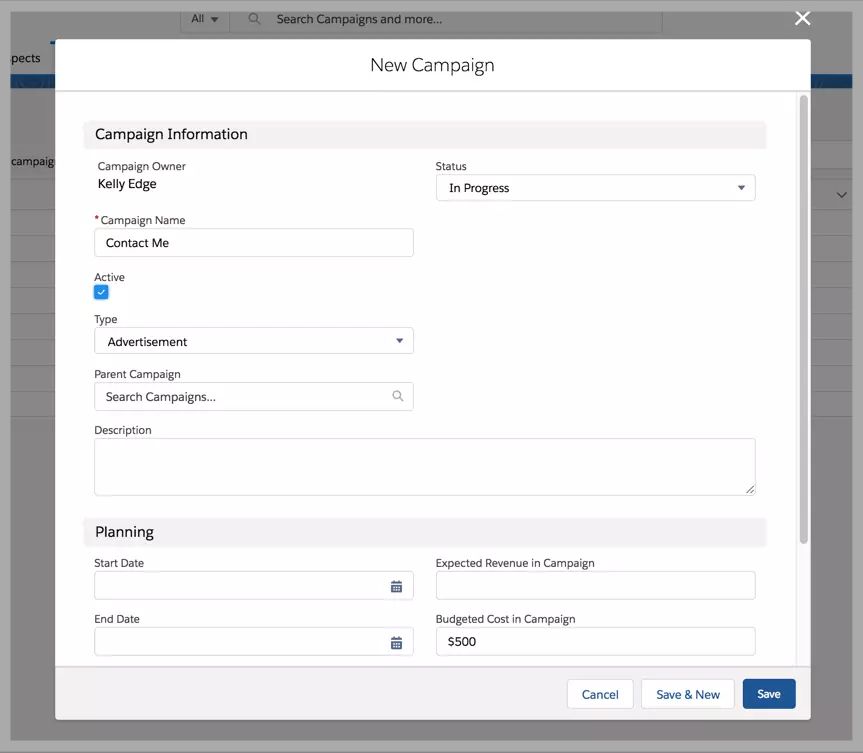
9. Set Up a Campaign in Salesforce Pardot
To create a new campaign follow these steps:
- Navigate to the Campaigns Tab.
- Click New.
- Select Parent Campaign record type.
- Enter Contact Me in the Name field for the campaign.
- Select In Progress for the Status.
- Click Active.
- Click Save to save the new campaign.