Salesloft Getting Started
Customize the Salesloft Getting Started template and surface the training in-app to maximize sales rep productivity.
1. What is Salesloft?
Salesloft is a sales engagement platform designed to support and streamline sales processes.
The platform provides various tools and features to streamline sales activities, improve communication with prospects and customers, and enhance overall sales efficiency. Some popular features offered by SalesLoft include:
- Cadence Management: SalesLoft allows users to create and manage sequences of actions, such as emails, phone calls, and social media interactions, that are scheduled to engage prospects and guide them through the sales funnel.
- Email Tracking and Analytics: The platform offers email tracking and analytics capabilities, allowing salespeople to monitor recipient engagement with their emails. This includes tracking open rates, click-through rates, and response rates.
- Communication Templates: SalesLoft enables users to create and use standardized email templates, call scripts, and messaging templates to maintain consistency and save time when communicating with prospects.
- Integration: SalesLoft integrates with various customer relationship management (CRM) systems, marketing automation tools, and other sales-related software to ensure seamless data sharing and workflow management.
- Analytics and Reporting: The platform provides insights and reports on sales activities, engagement metrics, and performance data to help sales teams refine their strategies and improve their outreach efforts.
- Prospecting: SalesLoft assists in finding and targeting potential leads and prospects through its prospecting tools and data enrichment features.
- Social Selling: The platform often includes features for social media integration, allowing sales professionals to engage with prospects on social platforms as part of their outreach efforts.
- Workflow Automation: SalesLoft offers automation capabilities to reduce manual tasks and streamline repetitive processes, enabling sales teams to focus on more strategic activities.
SalesLoft aims to enhance the effectiveness of sales teams by providing a centralized platform for managing outreach, increasing engagement, and optimizing the sales process.
Take Your Sales to the next level! Let’s go!
2. Logging into Salesloft
How to log into Salesloft (and add the chrome extension)
- The Chrome extension is a plug-in that brings Salesloft features to your browser so you can access Salesloft from any page you’re on whether it’s email, Salesforce, and much more
✅ Go to Salesloft’s sign in page and input your login credentials

Download the Chrome extension 1 of 3 ways:
- Go here and click “Add to Chrome”
- Click on the link provided in the notification bar prompting you to install the Salesloft Chrome extension.

- Log into Salesloft and go to Settings by clicking your name in the upper right corner of the page
- Go to the Downloads tab, and from there, you’ll see the option for the Salesloft Chrome
- Click “Install Chrome Extension” and it’ll take you to the page to complete the

3. Setting Up Salesloft for the First Time
Setting up your Salesloft account as a new user
When logging into Salesloft for the first time, here’s a checklist to complete setting up your account:
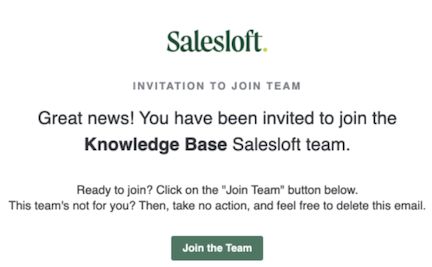
✅ Accept your invite to Salesloft:
- You will receive an email from Salesloft when your admin invites you to Salesloft
- Accept the invite by clicking on “Join The Team” in the invite email
- You will be taken to Salesloft where you’ll be prompted to fill in more information such as your job role and create a password
✅ Install the Google Chrome extension
✅ Connect Your Email Account:
- Navigate to Settings and select Email on the left.
- Select Connect Account (Gmail or Outlook) then sign into your email account. Allow Salesloft access to your email account.
- Enter your email password, and you’re connected! (Please Note: If you change your password, you will have to reconnect your email to Salesloft)
✅ Connect to Your CRM: This is required in order for activities you log in Salesloft to sync to Salesforce as completed Tasks records.
- Go to Settings then select CRM.
- Click “Connect”
- Select “Connect to Salesforce”

- You will be directed to your Salesforce login page
- Log in to connect Salesloft to your Salesforce account
- Once you’re connected, you’ll see your Salesforce username as connected

✅ Set Up Your Email Signature
✅ Complete Your User Setup
- This step encourages you to create your first email template and cadence. Once you complete these, your Salesloft homepage will remove the checklist and show your Home Dashboard.
4. Navigating Salesloft
How to navigate Salesloft
The Navigation Bar can be located at the top of the page ⬆ :

The Navigation Bar includes:
- Salesloft Icon: Clicking the Salesloft icon will take you to your Salesloft Home Dashboard
- Cadence: This takes you to the cadence page where you can see your personal and team cadences as well as create new ones
- Conversations: This takes you to Conversation Intelligence where you can find your call recordings
- Deals: This takes to the Deals page where you can view and edit your opportunities (sales pipeline) and analytics
- Search Bar: Global search to find People or Accounts in the Salesloft platform
- Live Feed (Heartbeat Monitor Icon): This takes you to your Live Feed which provides real-time alerts of your emails’ tracking activities
- Messenger Icon: Opens the Messenger pane in the bottom right corner of the platform so you can send SMS text messages
- Dial Pad Icon: Opens the Dialer in the bottom right corner of the platform
- Question Mark Icon: This opens up a dropdown menu of options that direct you to related articles for the page you are currently on, Salesloft support, Salesloft University, Knowledge Base, and where to submit product feedback
- Lightning Bolt Icon: This takes you to your CRM notifications which shows any activity that failed to sync to Salesforce. It will also show you your Salesforce status – whether you are connected or disconnected
- Your name: This opens up the main menu settings dropdown
- Rocket Ship Icon: Click this to run a cadence from anywhere within the Salesloft platform
The sidebar panel is another area that allows you to quickly navigate within Salesloft
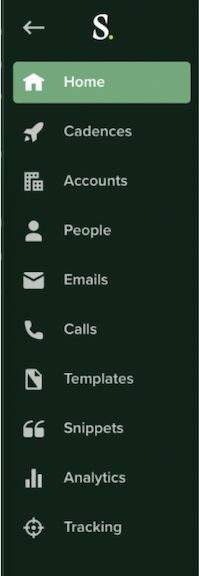
Note📝 : These links will re-direct you to the Salesloft Help Center
- Home (house icon): Takes you to the Salesloft Home Dashboard.
- Cadences (rocketship icon): Takes you to the Cadences page.
- Accounts (building icon): Takes you to the Accounts page.
- People (person icon): Takes you to the People page.
- Emails (envelope icon): Takes you to the Email page.
- Calls (phone icon): Takes you to the Calls page.
- Templates (page icon): Takes you to the Templates page.
- Snippets (quotation mark icon): Takes you to the Snippets page.
- Analytics (bar graph icon): Takes you to the Analytics page.
- Tracking (tracker icon): Takes you to the Live Website Tracking page. (Note: Must be enabled for this to be visible.)
5. Building an Email Template in Salesloft
An email template is a pre-defined email subject and body content including text and images
- Save you time by providing a bulk of the email
- Do not have to create from scratch each time
- Can standardize language and design across emails
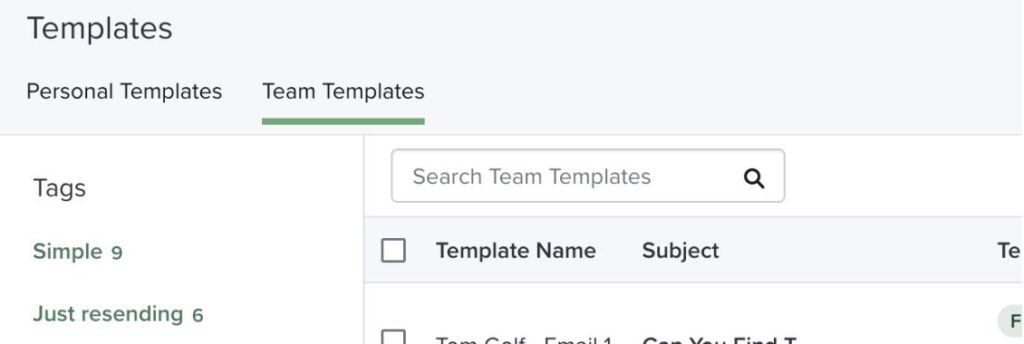
Personal templates are templates you create for your own use
Team templates are templates that are available to everyone on your team with a Salesloft account
You can find email templates on the Templates page
The two tabs for Personal vs. Team templates allow you to easily find your templates vs. the ones created for team use.
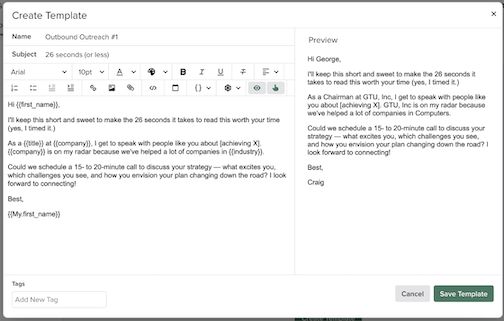
How to create a new template:
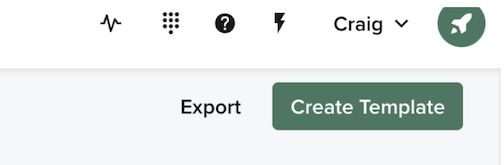
- Go to the Template page
- Click “Create Template”
- Fill in template details
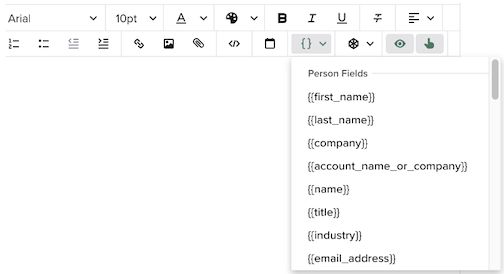
- Leverage tokens that allow you to personalize the email message such as first name, title, and company name
Best Practices
- Leverage team templates as much as possible
- Utilize tokens as they save you time when sending out emails and can add more personalization.
- Develop an outbound strategy with the broader sales team before building out templates. Everyone on the team should know what templates are available and when to use them.
Work with your team to create team templates as they allow you to have unified messaging! This can also provide insight into what messaging is working or not working which is difficult to measure if everyone is using personal templates.
6. Dialing through Salesloft
The different ways you can make a call using Salesloft
One-off calls:
📞 From the Dialer
- Click the keypad icon to open the dialer
- Go to the Person tab and search for the person you want to call by either name or email
- Click “Call”
- When you’re done with your call, you can log call notes, disposition, and sentiment in the same window then click “Log”
- This saves the call on the person record in Salesloft and your CRM
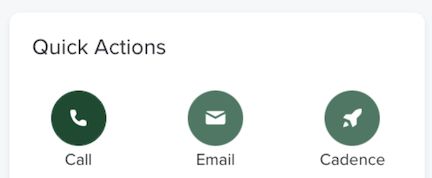
From the Person’s Profile Page
- Go to the left panel and scroll to Quick Actions
- Click on the phone icon to call
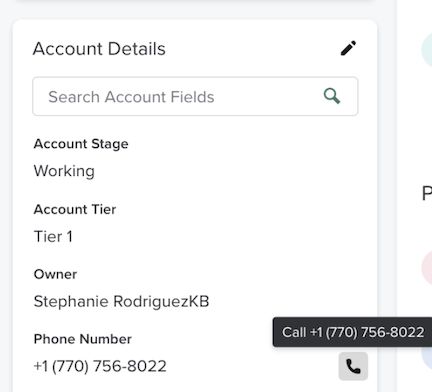
From the person’s Details panel on their profile page
click their phone number to call
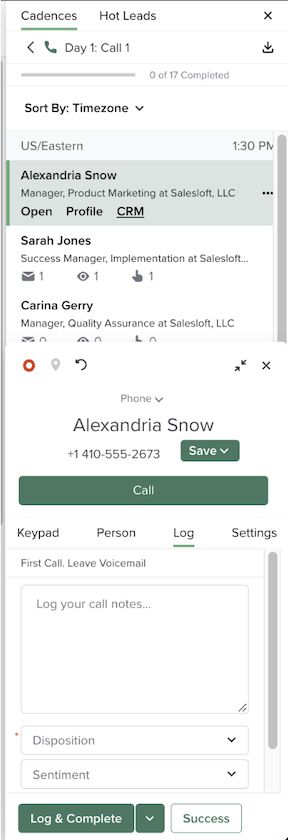
From a Cadence
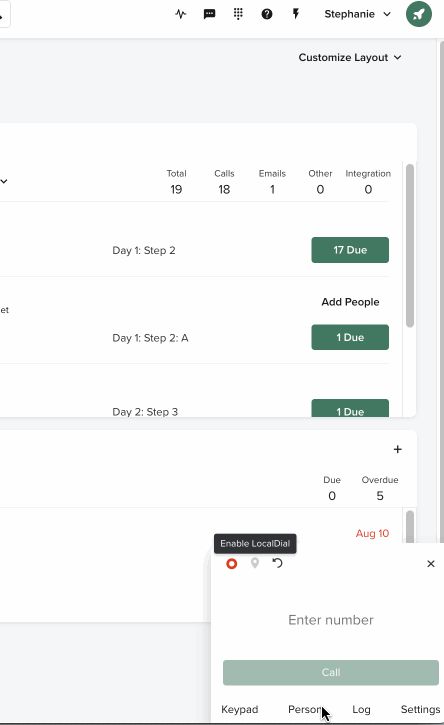
The most common and easiest way to make your calls for the day is through a cadence.
When you have a cadence set up with call steps, you simply run down your workflow list for the day and run your call steps.
To run a call step, do the following:
- Start your cadence
- From the workflow side panel, select “Run Step” next to the phone step from the Cadence’s To-Do list
- You will then be redirected to the person’s profile page where you’ll be able to see all their details
- The Dialer will also pop up from the bottom right corner of the screen with the person’s number already entered
- Click “Call”
- After the call ends, log your call notes, select a disposition, select a sentiment
- Click “Log & Complete”
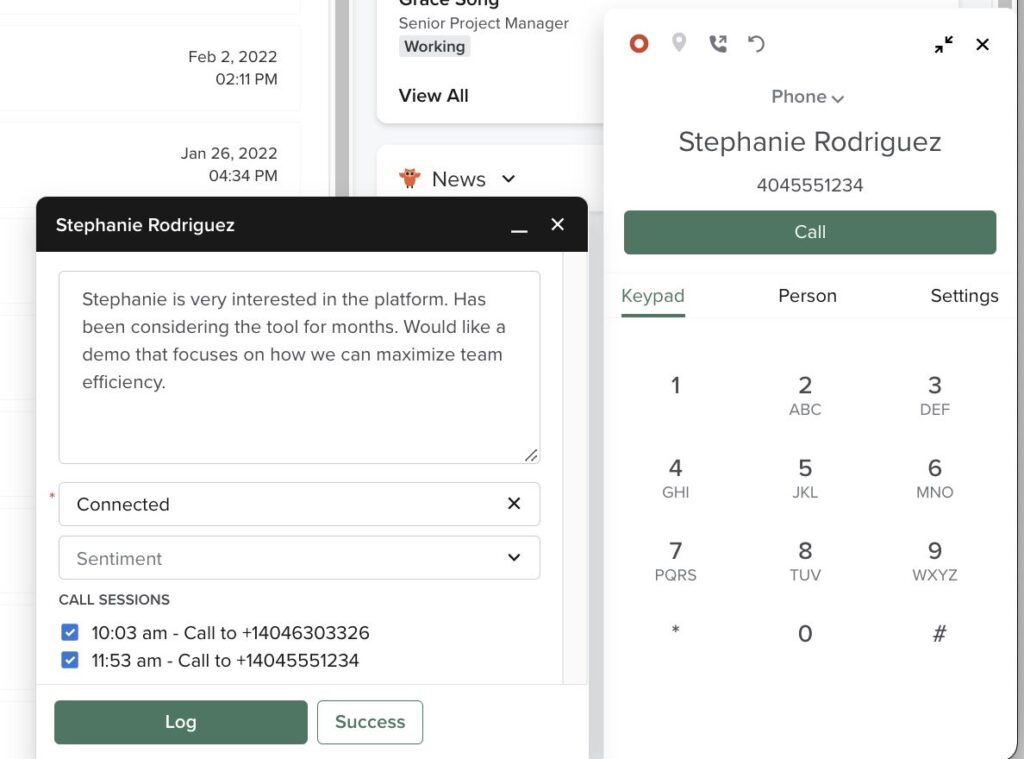
7. Logging a Call in Salesloft
How to log a call
- Logging calls is important to capture any notes and outcomes
- Provides reporting insights into call volume and quality and impacts to pipeline
The call log window will pop up once your call is completed.
8. Setting up a Basic Cadence in Salesloft
Salesloft Cadences
- What they are
- Why they matter
- How to create one
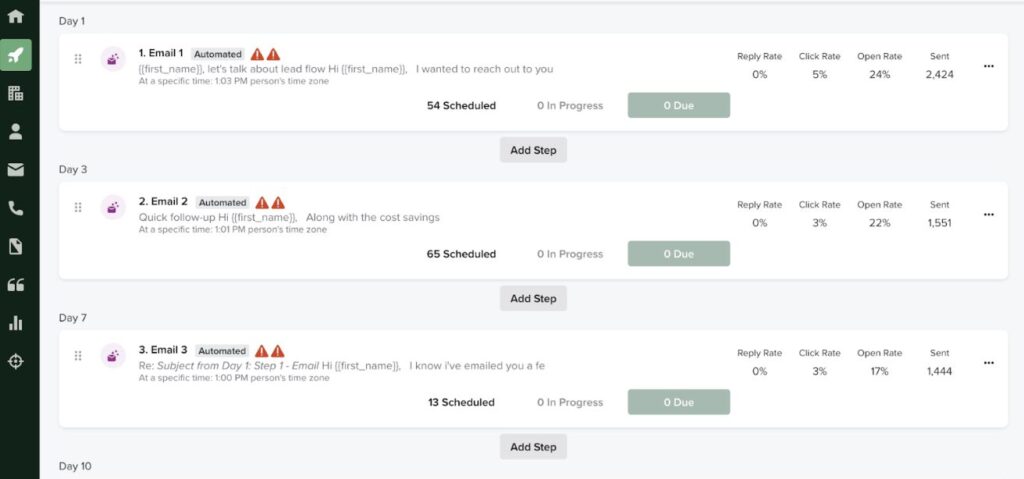
A cadence is a sequence of different sales outreach activities for sales reps to connect with target people
- Spans a fixed period of time (usually several weeks)
- Includes various methods of outreach including email, phone, and LinkedIn
- Goal of booking a meeting with potential customers and close deals
Cadence Examples
How to create a cadence:
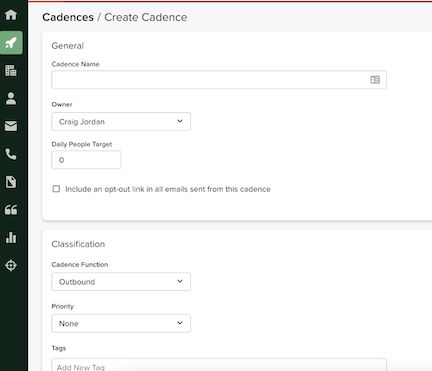
- Go to the cadence page and click “Create Cadence”
- Fill in the cadence settings details then click “Create Cadence”.
- Note 📝 : You can always go back to settings to make changes if needed
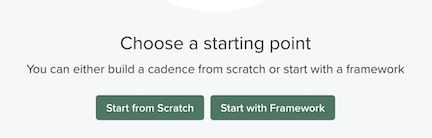
- Add your cadence steps
- You can either start from scratch or choose one of the many Salesloft cadence templates to build off of
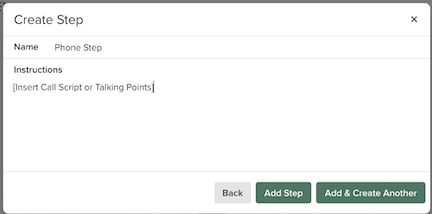
Start From Scratch
- Select the touchpoint type you’d like to add
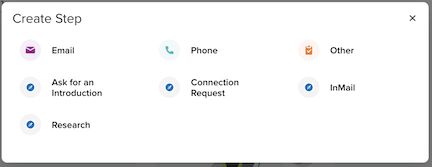
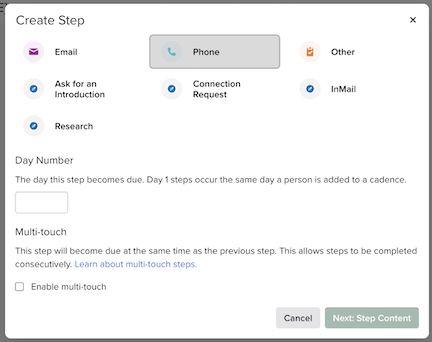
- Add your step details
- Click “Add Step”
- You can also go straight into adding another step by clicking “Add & Create Another”
More on Cadence Settings:
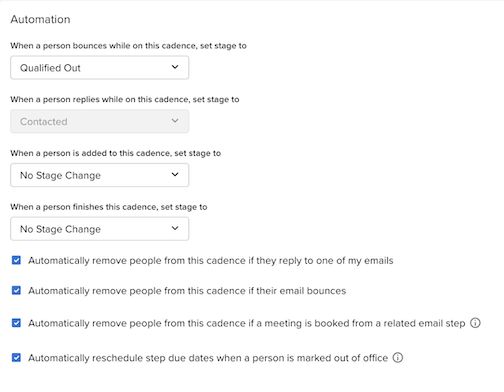
- Sharing: This is where you set your cadence type (personal or team) and update sharing settings to allow team members access to your cadence.

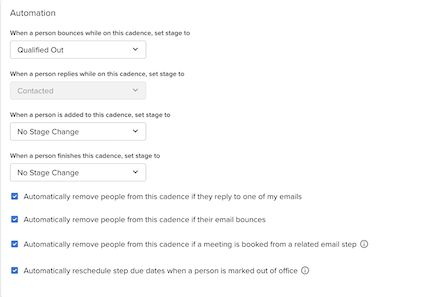
- Automation: This is a powerful feature in Salesloft and one that should be leveraged. This is built-in automation that makes it easy to update the Prospect Stage and remove people from the cadence based on how they engage with the cadence.
- Delete: Our recommendation is to NEVER delete, but instead archive by selecting “Archive Cadence”.

9. Adding/Removing people from a cadence in Salesloft
How to add/remove people from your Salesloft
cadences to streamline your workflow
- One-off person additions
- Adding person lists
- Setting up auto-removal rules
Adding people to a cadence
Part of the process of importing leads or contacts into Salesloft is adding them to a cadence. This is, by far, the most efficient way of adding leads to a specific cadence.
🔍 Search for details on how to import leads and contacts from Salesforce in another Spek!
You can also add Salesloft people into a cadence on a one-off basis by following these steps:
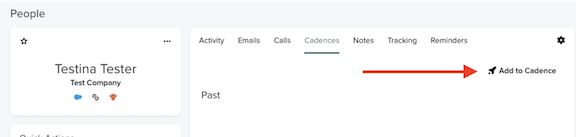
- Navigate to the person’s profile page in Salesloft
- Go to the Cadences tab
- Click “Add to Cadence”
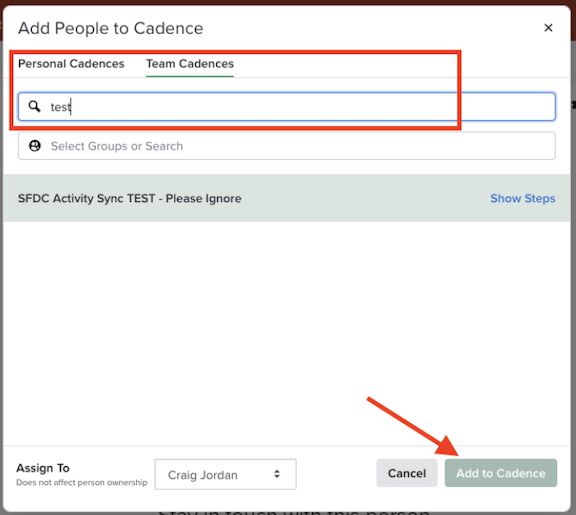
- Find the specific cadence search and/or select the cadence you’d like
- Click “Add to Cadence”
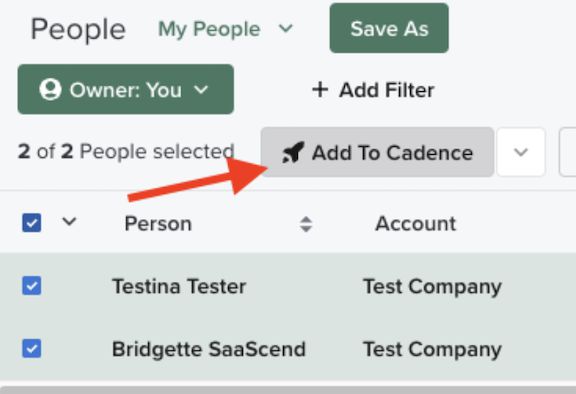
- You can also add a person or groups of people from the My People page
- Check the box(es) next to the Person you’d like to add
- Click “Add to Cadence”
Removing people from a cadence
- Removing people from a cadence is easy!
- You can set specific rules that will automatically remove people based on how they engage with your cadence.
How to update your cadence settings for removing people:
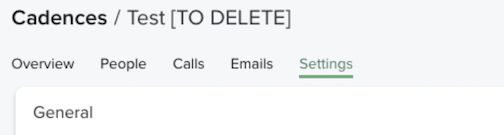
- Navigate to the Settings tab from the cadence you’d like to edit.
Note: 📝 The 3rd option only works if you are using Salesloft Meeting Link
You can also remove people manually by doing the following:
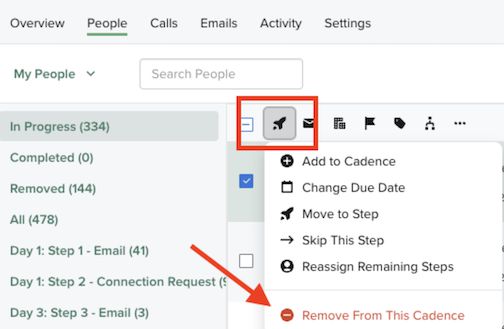
- Navigate to the desired cadence and go to the People tab
- Check the box next to the person you’d like to remove from the cadence then click on the rocketship icon to open up Cadence Actions
- Select “Remove From This Cadence”
10. Cadence Use Cases in Salesloft
Salesloft cadences are a powerful way to streamline sales activities, but how you utilize them is just as important
Outbound cadences are a great way to reach out to cold leads that you’ve identified as potential prospects.
For messages, here are some ideas to get started:
Using cadences to standardize follow-up:
- Ensure all qualified leads get the same treatment
- Take the guesswork out of follow-up by ensuring any inbound lead assigned to you will be followed up within a timely manner and receive multiple touches.
Here are some common inbound follow up use cases:
- Demo Request: Follow up with a lead that has requested a demo. (Hot Tip: Include your scheduling link in the emails to remove even more friction.)
- MQL: Follow up with a marketing qualified lead to book a meeting.
- Content Download: Follow up with a lead that downloaded a specific piece of content from the website. (Note: If your organization uses lead scoring, you can use that as criteria by only following up with leads that have reached a certain threshold.)
Unqualified
Cadences are also a great way to reach out to leads that were once unqualified.
Here are some ideas for unqualified cadences to win back these leads:
Closed Lost Reason
Similar to unqualified leads, we also have closed lost opportunities that have the potential to open up in the future. Here are some examples of closed lost cadences to re-open opportunities:
- Closed Lost due to timing
- Closed Lost due to budget constraints
- Closed Lost due to competition
- Closed Lost due to product fit
11. Prospecting with Salesloft
Prospecting with Salesloft
Adding new people to Salesloft:
This is for those times you’re researching and find a good person on a website or LinkedIn, referred via an email, or any instance where you want to quickly add a person you just came across.
Note 📝 : Before you can add ANY person, be sure you have their email address. This minimizes duplicates as the email address is a unique identifier across Salesloft and Salesforce
- Open the Salesloft Chrome extension, and check to see if the person you want to add is already in Salesloft by searching for the person by the email address.
- If the person isn’t in Salesloft, you are good to create a new person record!
- Create the person.
- [Recommended] Add to an outbound cadence.
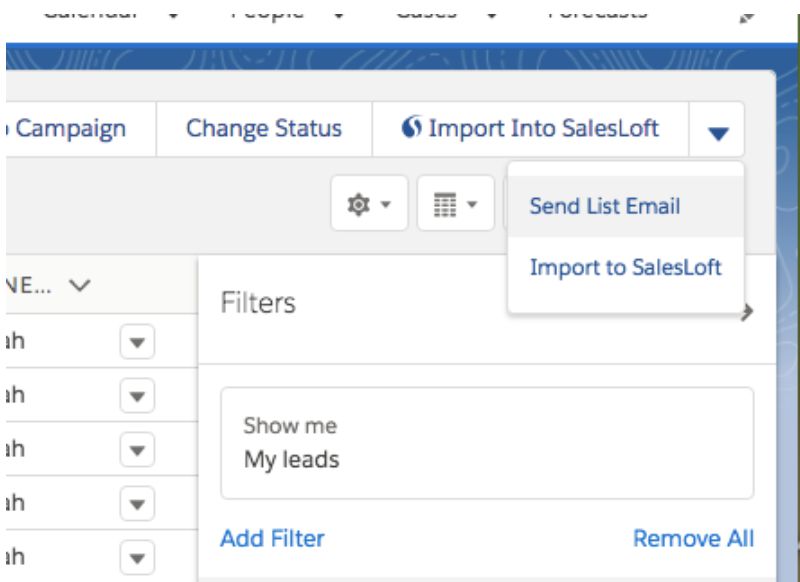
Importing person from Salesforce: You can import people into Salesloft from Salesforce with the following methods:
- Lead List View (max. 500 records at a time)
- Contact List View (max. 500 records at a time)
- Campaigns
- Reports (max. 2,000 records at a time)
- Lead or Contact Record Page
To import into Salesloft, go to any of the above Salesforce pages whether it’s an individual record, list view, campaign or report page and click on the “Import to Salesloft” button.